

This post may contain affiliate links. Please see my disclosure policy for details.
Small Christmas Tree Decorating Ideas That’ll Make Your Miniature Masterpiece Shine
Contents
- Small Christmas Tree Decorating Ideas That’ll Make Your Miniature Masterpiece Shine
- Why Your Small Tree Deserves Just as Much Love
- The Three Designer-Approved Styles That Actually Work
- The Pre-Decorating Step Nobody Talks About
- The Spacing Secret That Separates Amateurs from Pros
- DIY Ornaments That Don’t Look DIY
Small Christmas tree decorating ideas can transform even the tiniest corner of your home into a festive focal point without overwhelming your space.
I’ve decorated countless small trees over the years, and honestly, they’re my secret weapon for spreading holiday cheer everywhere—from my kitchen counter to my daughter’s bedroom nightstand.
Let me walk you through exactly how to make your petite pine look absolutely spectacular.
🌟 Steal This Look
- Paint Color: Sherwin-Williams Agreeable Gray SW 7029
- Furniture: narrow console table or floating shelf to elevate the tree as a designated vignette
- Lighting: battery-operated micro LED string lights with warm white glow
- Materials: matte ceramic ornaments, velvet ribbon, natural wood beads, mercury glass accents
There’s something deeply satisfying about creating a perfect little world in miniature; I find myself spending more time fussing over my 3-foot kitchen tree than my big living room one because every single element matters.
Why Your Small Tree Deserves Just as Much Love
Look, I get it. You’re wondering if a tabletop tree really needs the full decorating treatment.
The answer is absolutely yes.
Small trees pack serious visual punch when done right, and they solve so many problems:
- Apartments with zero floor space
- Kids’ rooms that need their own holiday magic
- Mantels begging for something festive
- Offices where you want Christmas without commitment
- Multiple rooms where you want coordinated holiday vibes
I started decorating small trees when my studio apartment could barely fit a houseplant, let alone a six-footer.
The Three Designer-Approved Styles That Actually Work
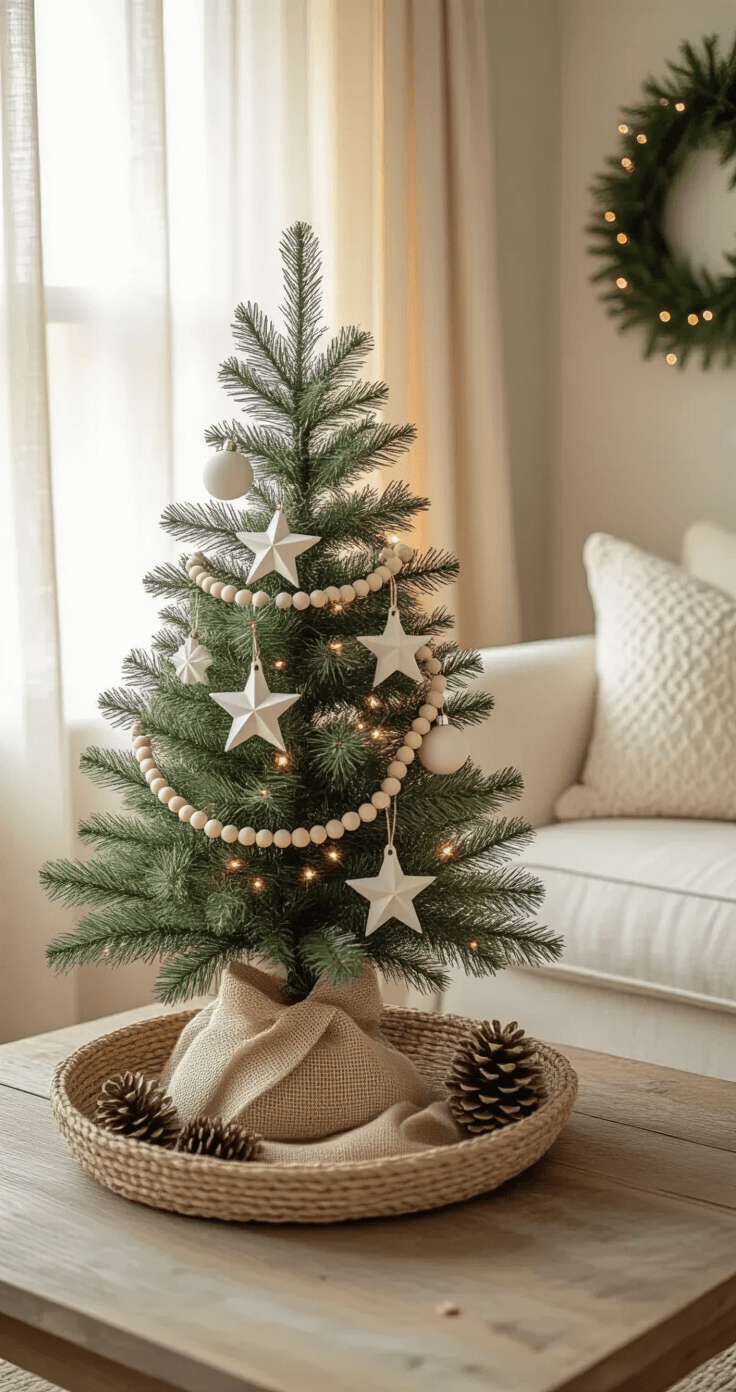
Cozy Neutral: The “I’m Effortlessly Chic” Approach
This style feels like wrapping yourself in a cashmere blanket with hot cocoa.
The color palette:
- Warm creams and whites
- Natural wood tones
- Touches of burlap or linen texture
- Pinecones (the real MVPs here)
Here’s what you’ll need:
Start with wooden bead garland that you can make yourself or buy pre-strung. I prefer making mine because I can control the bead sizes and spacing.
Grab some porcelain star ornaments in white or cream. These catch the light beautifully without screaming for attention.
Add natural pinecone picks tucked throughout.
The ribbon technique that changes everything:
Forget wrapping ribbon around your tree like you’re gift-wrapping it. That’s amateur hour.
Instead, take textured ribbon and wrap it horizontally, but—and this is key—tuck sections toward the center of the tree. This creates depth and movement instead of flat circles.
The ribbon should look like it’s weaving through the branches, not strangling them.
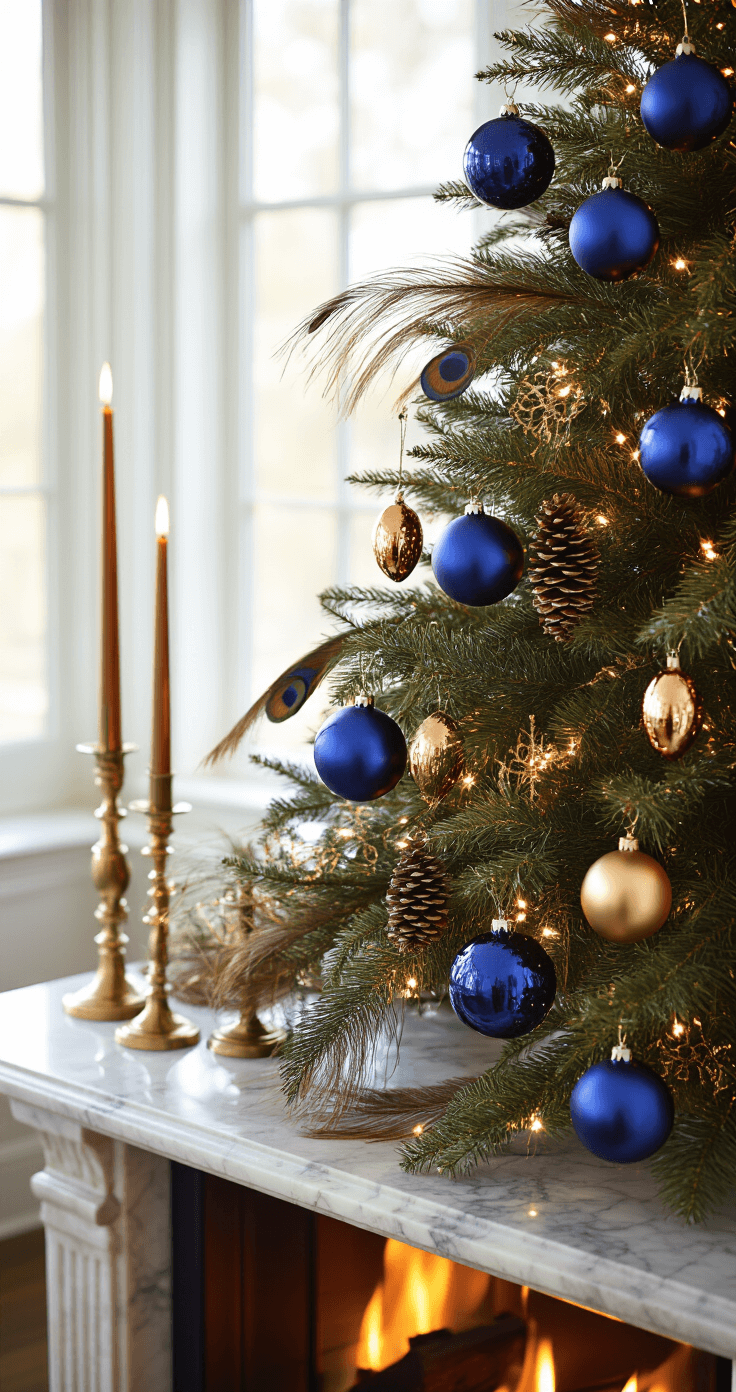
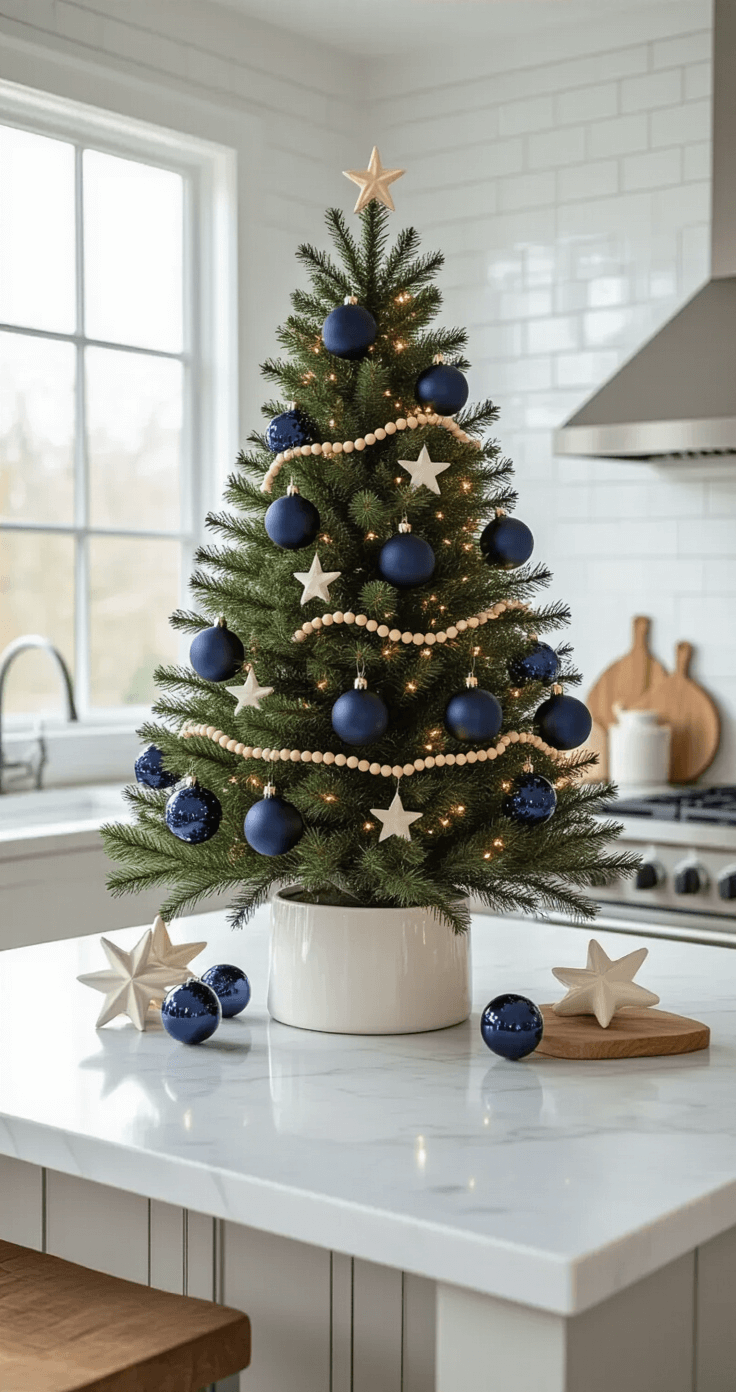
Jewel-Toned Feather Tree: Old Hollywood Meets Victorian Charm
I stumbled onto this style by accident when I inherited my grandmother’s collection of navy glass ornaments.
The winning combination:
- Deep navy blues
- Rich copper tones
- Antique gold accents
- Actual feathers (yes, really)
Pick up navy glass ball ornaments in mini sizes. The smaller scale matters here—oversized ornaments on small trees look like a bad proportion joke.
Add copper mini egg ornaments throughout. The shape variation keeps things interesting.
The feather secret:
Long pheasant feathers aren’t just ornaments—they’re gap fillers. Tuck them into spots where your tree looks sparse. They add movement, texture, and an unexpected element that makes people lean in closer.
Ribbon layering 101:
Layer a 1-inch copper velvet ribbon with a 3-inch gold wired metallic ribbon. The texture contrast is what makes this work. Smooth with rough, narrow with wide.
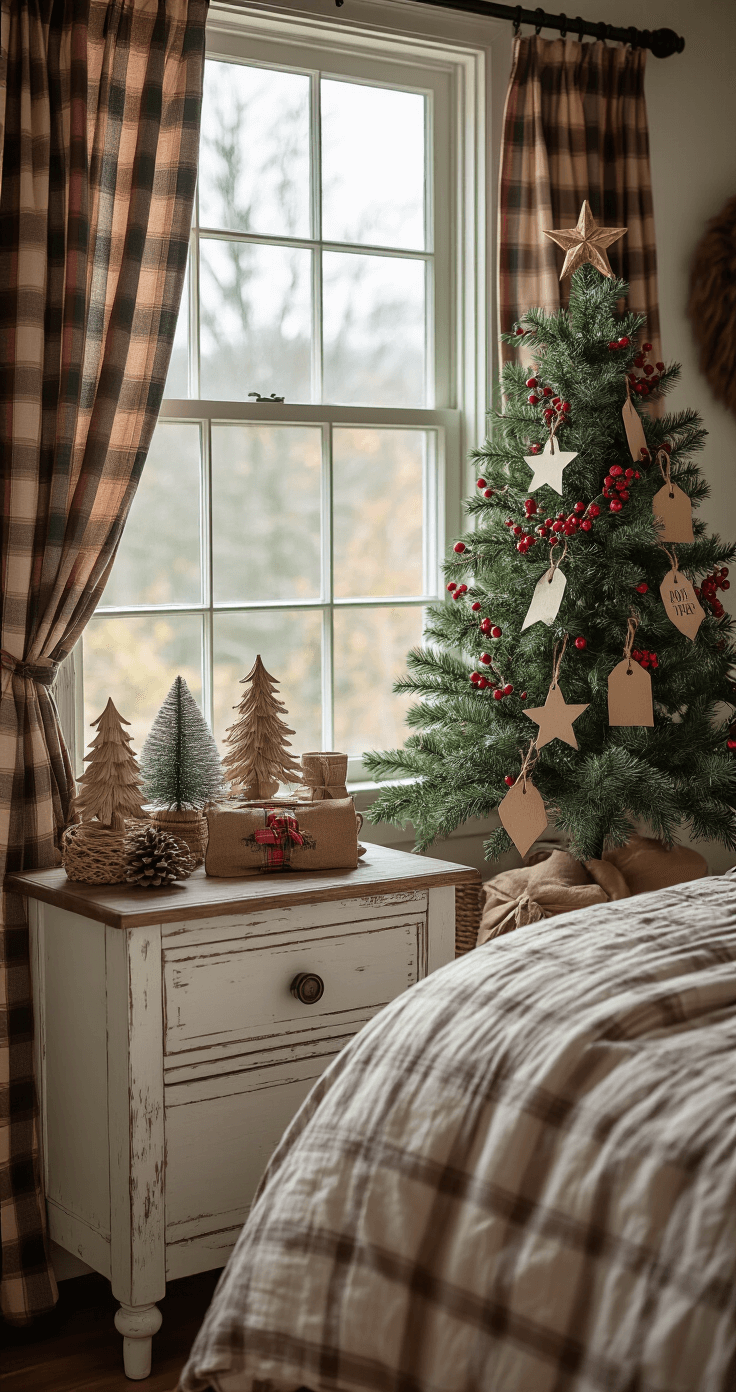
Vintage Memories: The “Grandma’s Attic” Vibe (But Make It Stylish)
This style hits different if you’re into that cozy cabin aesthetic.
Start from the top:
Grab wired plaid ribbon—the wire edge is non-negotiable because it holds its shape.
Begin at the tree top and work downward, creating cascading loops. Don’t just wrap it—let it tumble through the branches like a festive waterfall.
The ornament strategy:
Cabin-themed ornaments, wooden tags, vintage-looking pieces—distribute them evenly. And I mean genuinely evenly.
Stand back every few ornaments and squint at your tree. If one section looks heavy and another looks bare, fix it immediately.
Berry picks for the win:
Red berry picks add those crucial pops of color. Tuck them randomly throughout, not in a pattern. Nature isn’t symmetrical, and neither should your berry placement be.
💡 Steal This Look
- Paint Color: use Farrow & Ball brand. Match the ACTUAL wall color in the image. Format: Farrow & Ball ColorName CODE
- Furniture: slipcovered linen sofa in natural oatmeal, reclaimed wood coffee table with live edge, woven jute area rug
- Lighting: oversized linen drum pendant with brass hardware, table lamp with ceramic base in chalk white
- Materials: raw Belgian linen, bleached oak, hand-thrown ceramics, unbleached cotton, foraged pinecones
This is the style I return to when holiday hosting feels overwhelming—there’s something deeply reassuring about a tree that looks beautiful even when the ornaments are slightly asymmetrical and the ribbon has a few natural wrinkles.
The Pre-Decorating Step Nobody Talks About
Before you hang a single ornament, fluff your damn tree.
Seriously.
I spent years wondering why my trees looked scraggly compared to store displays. Turns out, I was skipping the most important step.
The fluffing technique:
- Bend every branch outward
- Separate each individual tip
- Work from the inside out
- Spend a solid 10-15 minutes on this
Your tree should look about 30% fuller when you’re done. If your fingers aren’t tired, you haven’t fluffed enough.
The Spacing Secret That Separates Amateurs from Pros
Distributing ornaments evenly sounds obvious until you actually try it.
We naturally cluster ornaments in easy-to-reach areas and ignore the back and inner sections.
My foolproof method:
Divide your tree mentally into four quadrants. Place one statement ornament in each quadrant first. These are your anchors.
Then fill in with medium ornaments, ensuring each quadrant gets equal attention. Finish with small ornaments and picks to fill gaps.
The eyeball test:
Walk around your tree. From every angle, you should see a balanced display. If one side looks like Christmas exploded and another looks like February, redistribute.
🎨 Steal This Look
- Paint Color: use Valspar brand. Match the ACTUAL wall color in the image. Format: Valspar Snowcap White 7006-14
- Furniture: slim-profile console table in natural oak for displaying wrapped gifts beneath the tree
- Lighting: adjustable arc floor lamp with warm 2700K LED to spotlight the tree from multiple angles
- Materials: matte velvet ribbon, hand-blown glass ornaments, aged brass ornament hooks, faux snow-flocked branches
I learned this method the hard way after photographing my first professionally styled tree and realizing the back looked like a green cone with three lonely baubles—now I rotate my tree on a lazy Susan while decorating to catch every dead zone.
🎁 Get The Look
DIY Ornaments That Don’t Look DIY
I’m not crafty. I can barely fold a fitted sheet.
But even I can make these ornaments that


[…] Decorated Christmas trees in various color schemes (red, gold, white) […]
[…] minimalist Christmas tree strips away the noise and lets the natural elegance shine through. Think of it as the Marie Kondo […]