

This post may contain affiliate links. Please see my disclosure policy for details.
Why Your Mantel Deserves Star Treatment
Contents
- Why Your Mantel Deserves Star Treatment
- The Real Talk: What You’re Actually Getting Into
- Start With Garland That Actually Looks Full
- Light It Up Like You Mean Business
- Create Focal Points That Actually Focus
- Master the Art of Mantel Layering
- Color Schemes That Work Every Single Time
- The Setup Process That Actually Works
- Mistakes That Scream “Amateur Hour”
- Make It Instagram-Ready (Because You Know You Want To)
Your mantel sits at eye level. It’s the first thing people see when they walk into your living room. Unlike your Christmas tree tucked in the corner, your mantel commands attention from every angle in the room.
I’ve styled dozens of mantels over the years, and I can tell you this: a killer Christmas mantel beats a perfect tree every single time.
★ Steal This Look
- Paint Color: Sherwin-Williams Agreeable Gray SW 7029
- Furniture: tufted linen sofa in warm ivory, reclaimed wood coffee table with black iron legs
- Lighting: antique brass adjustable picture light mounted above mantel
- Materials: weathered barn wood, hand-thrown ceramic, aged mercury glass, chunky knit wool
I learned this the hard way after years of treating my mantel like a shelf for random holiday tchotchkes; the year I finally gave it intentional height and breathing room, my mother-in-law actually paused mid-conversation to ask who I’d hired.
The Real Talk: What You’re Actually Getting Into
Time Investment: Block out 2-3 hours if you want it done right
Money Reality: Expect to spend $75-$300 for a show-stopping display
Difficulty Level: Easier than wrapping presents, harder than hanging stockings
Payoff: Your living room becomes the Christmas card everyone wants to recreate
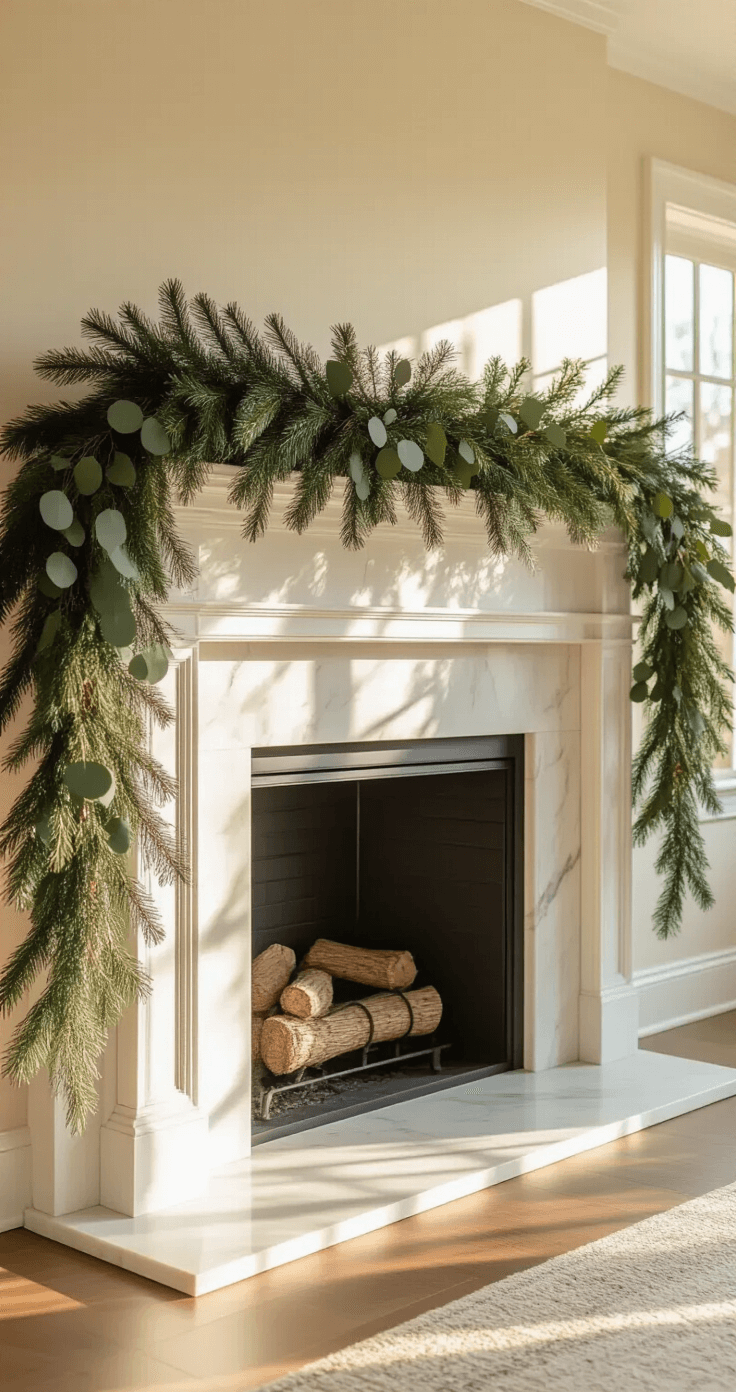
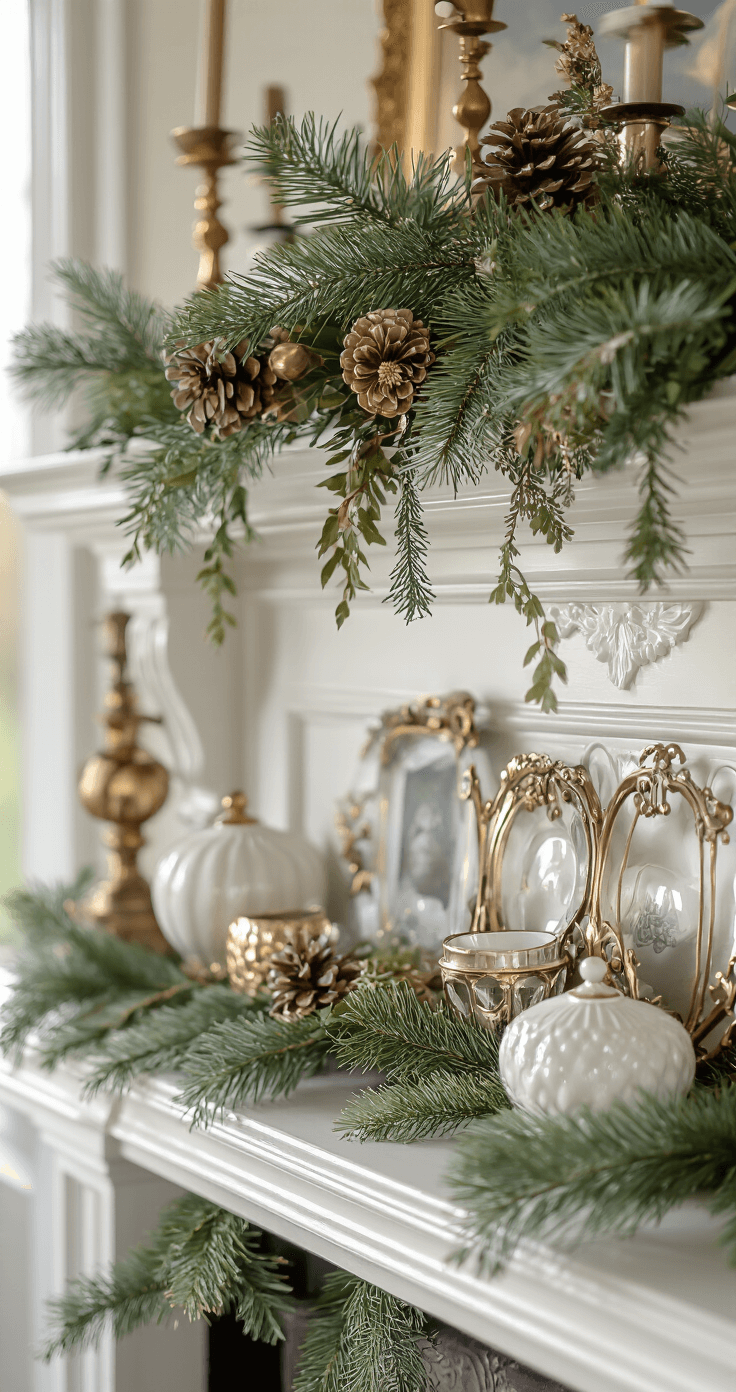
Start With Garland That Actually Looks Full
Here’s what nobody tells you about Christmas garland for mantels: one strand looks pathetic.
I learned this the hard way my first year. Bought one beautiful, expensive garland and hung it up like some kind of sad Christmas necklace. My mantel looked like it was wearing a sparse holiday lei.
The Fix: Layer two different garlands together.
Mix a dense pine garland with something textured like eucalyptus or ruscus. Weave them together so they look like one incredibly lush piece. Your mantel goes from “meh” to “magazine-worthy” instantly.
Pro moves for garland layering:
- Start with the fullest garland as your base
- Add the accent garland in loose, organic swoops
- Let some pieces drape lower than others for natural movement
- Use floral wire to secure connection points invisibly
🌟 Steal This Look
- Paint Color: Farrow & Ball Hague Blue No. 30
- Furniture: reclaimed wood farmhouse mantel shelf with substantial corbels
- Lighting: brass picture light mounted above the mantel
- Materials: mixed evergreen branches, dried eucalyptus, velvet ribbon, aged brass accents
I finally stopped fighting my narrow mantel and embraced the layering trick—now my living room feels like the cozy hearth I always imagined, not a craft store explosion.
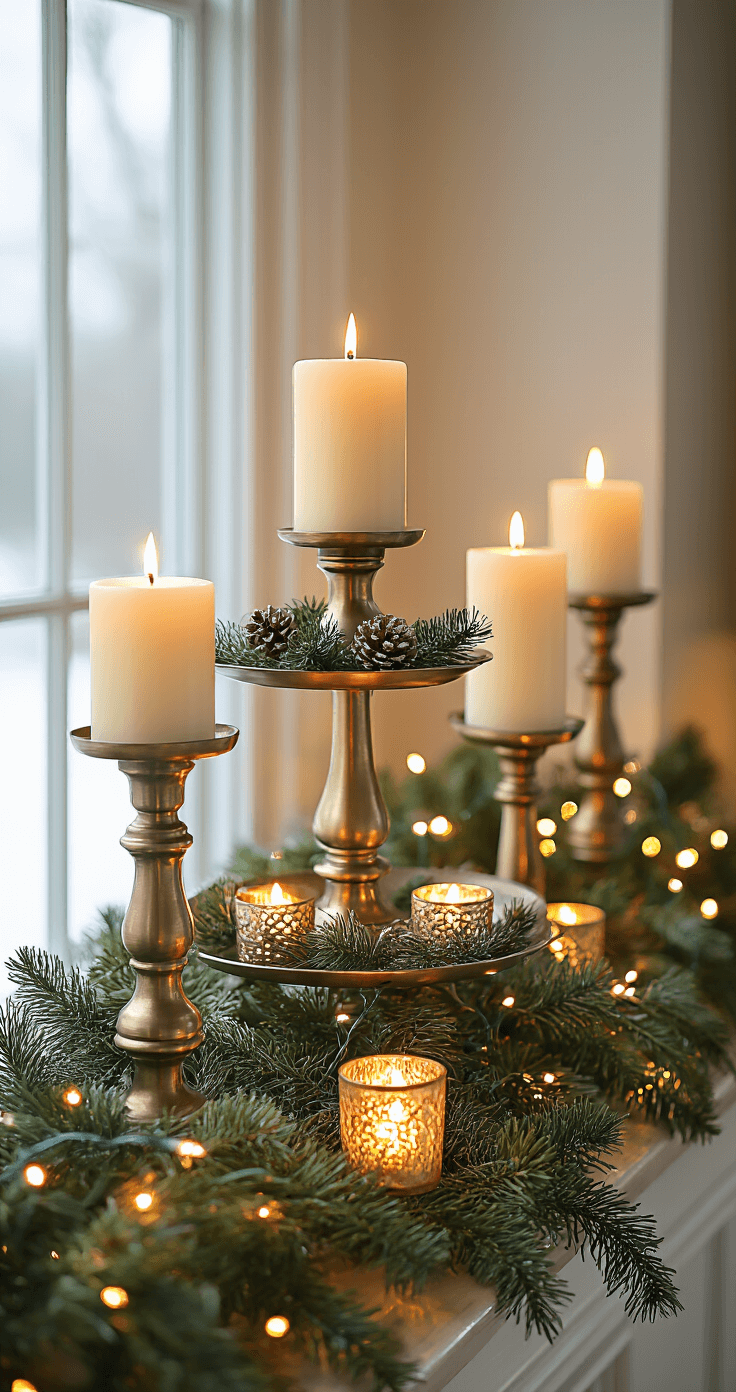
Light It Up Like You Mean Business
Candles make everything better. But Christmas mantel lighting needs strategy, not just random candle placement.
I use the triangle rule: place three different candle heights across the mantel span. Tall pillar candles on the ends, medium tapers in decorative holders scattered throughout, and small votives tucked into the garland.
Safety reality check: If you actually use your fireplace, stick with LED candles that look real. Nobody needs their Christmas decor going up in actual flames.
Add battery-operated fairy lights with green wire woven through your garland. The warm white glow makes everything look like it belongs in a holiday movie.
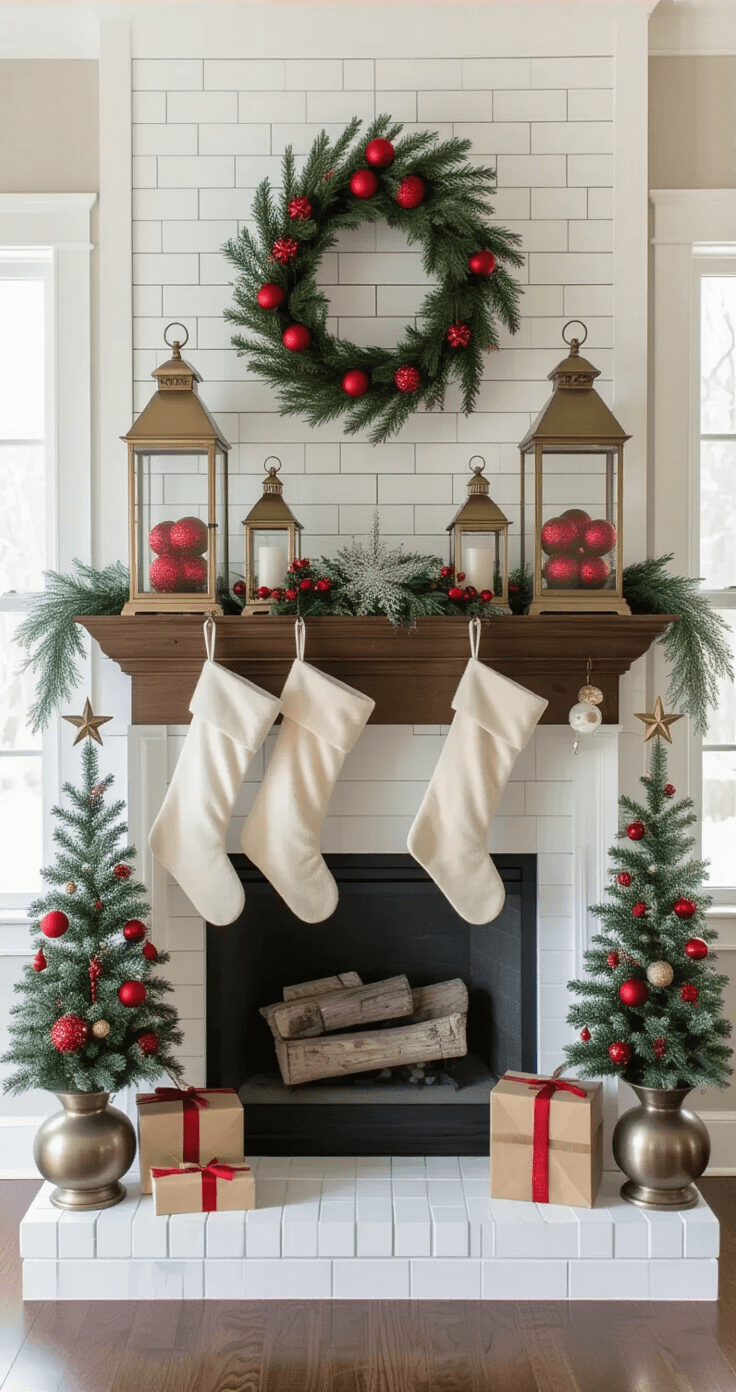
Create Focal Points That Actually Focus
Your mantel needs anchor pieces – decorations substantial enough to hold visual weight.
My go-to anchor pieces:
- Mini Christmas trees in varying heights
- Large lanterns filled with ornaments or greenery
- Oversized stockings hung at different lengths
- Statement candlesticks in brass or pewter
Place these anchor pieces first, then fill around them. Think of them as the furniture – everything else is accessories.
🏠 Steal This Look
- Paint Color: Valspar Swiss Coffee 7002-16
- Furniture: narrow console table or low credenza beneath mantel for additional display surface
- Lighting: taper candle wall sconces flanking the fireplace opening
- Materials: brushed brass, weathered wood, matte ceramic, velvet ribbon
I learned this the hard way after years of perfectly symmetrical mantels that felt lifeless—once I started treating the mantel like a small stage set with intentional hierarchy, my holiday displays finally felt like the cozy, collected moments I was chasing.
Master the Art of Mantel Layering
Christmas mantel styling works like getting dressed. You start with basics and add layers until you look put-together, not overdressed.
Layer 1: Your garland foundation
Layer 2: Anchor pieces for structure
Layer 3: Medium decorations for interest
Layer 4: Small details that make people lean in closer
I always step back after each layer. Sometimes Layer 3 is perfect and Layer 4 makes it look cluttered. Know when to stop.
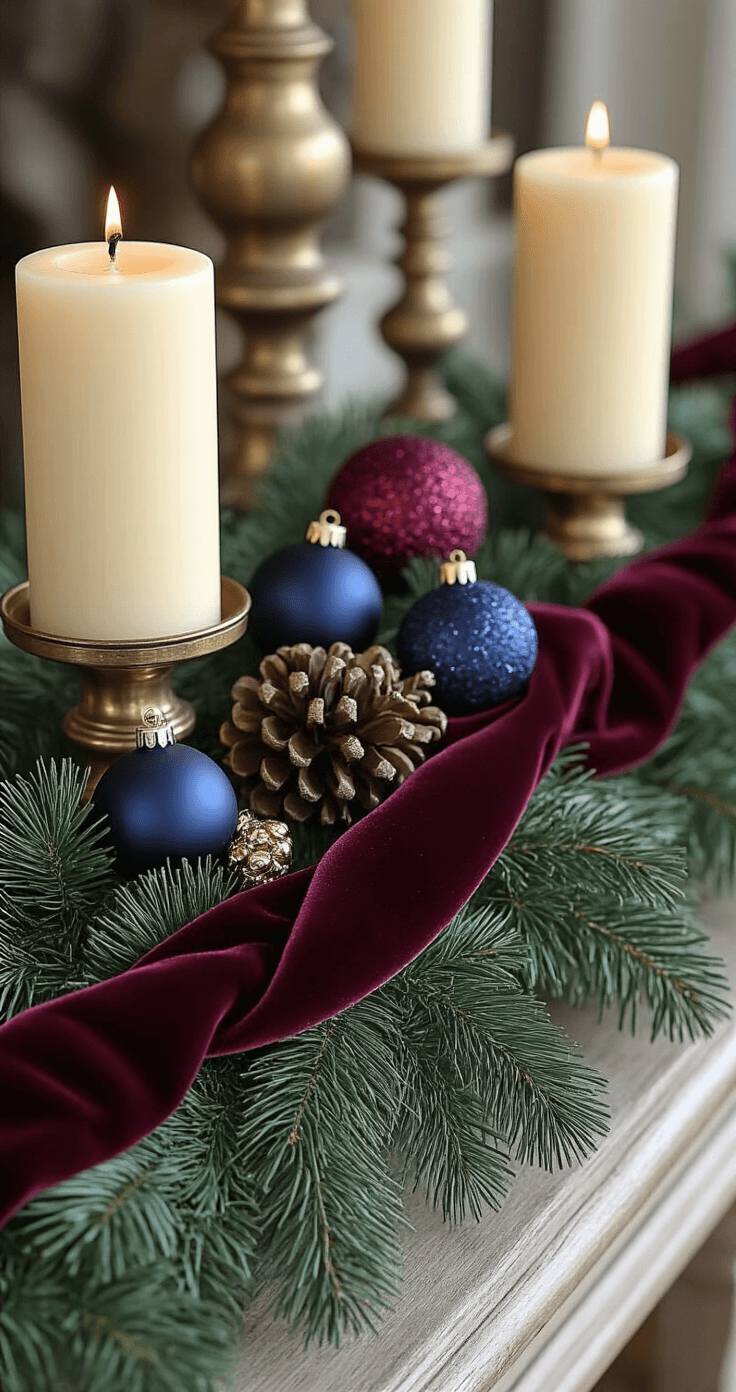
Color Schemes That Work Every Single Time
Traditional Red and Green: Still works, still gorgeous, never goes out of style
Burgundy and Navy: Sophisticated Christmas that works with any decor
Metallics with White: Modern Christmas that photographs beautifully
All Neutrals: Understated elegance that extends past December
I rotate between burgundy-and-gold years and all-neutral years. Depends on my mood and how much I want my Christmas decor to blend with my regular living room.
Pick your palette before you shop. Seriously. Write it down on your phone. Holiday decorating aisles turn rational people into magpies who grab everything shiny.
★ Steal This Look
- Paint Color: Dunn-Edwards Whisper White DEW 340
- Furniture: traditional mahogany fireplace mantel with carved corbels
- Lighting: brass swing-arm sconces with cream linen shades flanking the mantel
- Materials: velvet ribbon, aged brass, pine garland, mercury glass, raw linen stockings
I learned this the hard way after a ‘everything sparkly’ year that looked like a craft store exploded—now I photograph my living room in natural light before I shop, so I know exactly what tones already live there.
The Setup Process That Actually Works
Step 1: Clear everything off your mantel and clean it
Step 2: Lay out all your decorations on your coffee table first
Step 3: Install your garland using removable adhesive hooks
Step 4: Place your largest pieces first
Step 5: Fill in with medium pieces
Step 6: Add small details last
Step 7: Step back and remove one thing (trust me on this)
Mistakes That Scream “Amateur Hour”
- Skinny garland syndrome: One thin garland looks unfinished
- Everything the same height: Creates a flat, boring line across your mantel
- Forgetting about proportion: Tiny decorations on a massive mantel disappear
- Symmetry obsession: Perfect matching on both sides looks stiff and formal
- Overcrowding: More isn’t always merrier
💡 Steal This Look
- Paint Color: Fine Paints of Europe Hollandlac Brilliant White W1001
- Furniture: Restoration Hardware French Contemporary Mantel in aged white oak with substantial 8-inch depth shelf
- Lighting: Visual Comfort E.F. Chapman Branch Sconce in antique brass with natural paper shades, mounted 12 inches above mantel shelf
- Materials: Thick 6-inch diameter fresh Fraser fir garland, hand-blown glass ornaments in varying sizes (3-8 inches), aged brass stocking holders, Belgian linen stockings, rough-hewn reclaimed wood pillar candles, hammered copper tray
I learned the hard way after my first apartment mantel looked like a sad craft project—now I always start with one oversized, sculptural piece slightly off-center and build outward in odd numbers.
Make It Instagram-Ready (Because You Know You Want To)
Best lighting: Natural daylight from a nearby window
Best angle: Slightly off-center captures depth better than straight-on shots
Best time: Late afternoon when natural light gets warm and golden
Take photos before you turn on artificial lighting. Overhead lights create harsh shadows that hide your beautiful layering work


")


[…] about function – beautiful but unusable tables frustrate your […]