
This post may contain affiliate links. Please see my disclosure policy for details.
Why Most Dorm Makeovers Fail (And How to Avoid That Mess)
Contents
Most students do one of three things wrong:
They buy random stuff they like.
No plan. No color story. Just a cute tapestry here, some string lights there, and a throw pillow that matches nothing. The room ends up looking like a yard sale.
They overthink it and freeze.
Paralyzed by Pinterest perfection, they never commit to anything and live with bare walls until Thanksgiving.
They spend everything the first week.
Then they’re eating ramen for three months and still don’t have a desk lamp that actually works.
Freshman year I bought a teal comforter, pink pillows, a yellow rug, and grey curtains because I loved each piece individually. My room looked like a preschool had exploded.
Sophomore year I cracked the code: pick 2-3 colors, repeat them everywhere, and save half your budget for the stuff you realize you need two weeks in.

The One-Day Dorm Transformation Timeline That Actually Works
You don’t need a week. You need one focused day and a willingness to move furniture around three times before it clicks.
Morning (2-3 hours): The styling phase
- Make the bed with your new bedding
- Hang your main backdrop or art wall
- Arrange desk and nightstand surfaces
- Add lighting (string lights, lamps, whatever creates warmth)
Afternoon (1-2 hours): The shooting phase
- Capture wide shots showing the whole vibe
- Get vignette shots of styled corners
- Grab close-ups of textures and details
Evening (1-2 hours): The editing phase
- Import photos and delete the terrible ones
- Adjust brightness and straighten lines
- Export and write captions while the styling choices are fresh in your brain
I time-blocked my last dorm setup and finished by 6 PM with photos ready to post.

Smart Money: Where to Spend and Where to Fake It
I’ve decorated dorms for $80 and for $280. Both looked good in photos. The difference was knowing where quality matters and where it absolutely doesn’t.
Spend real money on these:
- Bedding – You’re looking at it and sleeping in it every day. Get a comfortable duvet cover in a neutral you won’t hate by October.
- Lighting – Overhead fluorescents make everyone look like a crime suspect. Invest in a warm LED desk lamp and some quality string lights.
- One statement rug – It defines your space and makes the room feel intentional instead of institutional.
Save aggressively on these:
- Wall art (print free designs at the library)
- Picture frames (thrift stores are overflowing)
- Decorative storage baskets (dollar store wins)
- Throw pillows (you need the inserts to feel good; the covers can be cheap)
My best dorm had a $70 rug, $45 in bedding, a $25 lamp, and about $40 in Dollar Tree baskets and Command hooks. Everything else was printed, borrowed, or DIY.

The Color Palette That Never Fails in Small Spaces
Dorms are tiny and usually beige. Fighting that with bright chaos makes them feel even smaller. Instead, build from neutral and add two accent colors maximum.
My formula:
Base layer (60% of what you see):
- Cream, soft white, light grey, or warm beige
- This goes on your bedding base, curtains, and largest surfaces
First accent (30%):
- One warm or cool tone that makes you happy
- Terracotta, sage green, dusty blue, or camel tan
- Use this in throw pillows, your rug, and 2-3 decor pieces
Second accent (10%):
- A slightly bolder shade that complements accent one
- Navy with camel, rust with sage, blush with grey
- Sprinkle this in smaller items like frames, plant pots, or one throw pillow
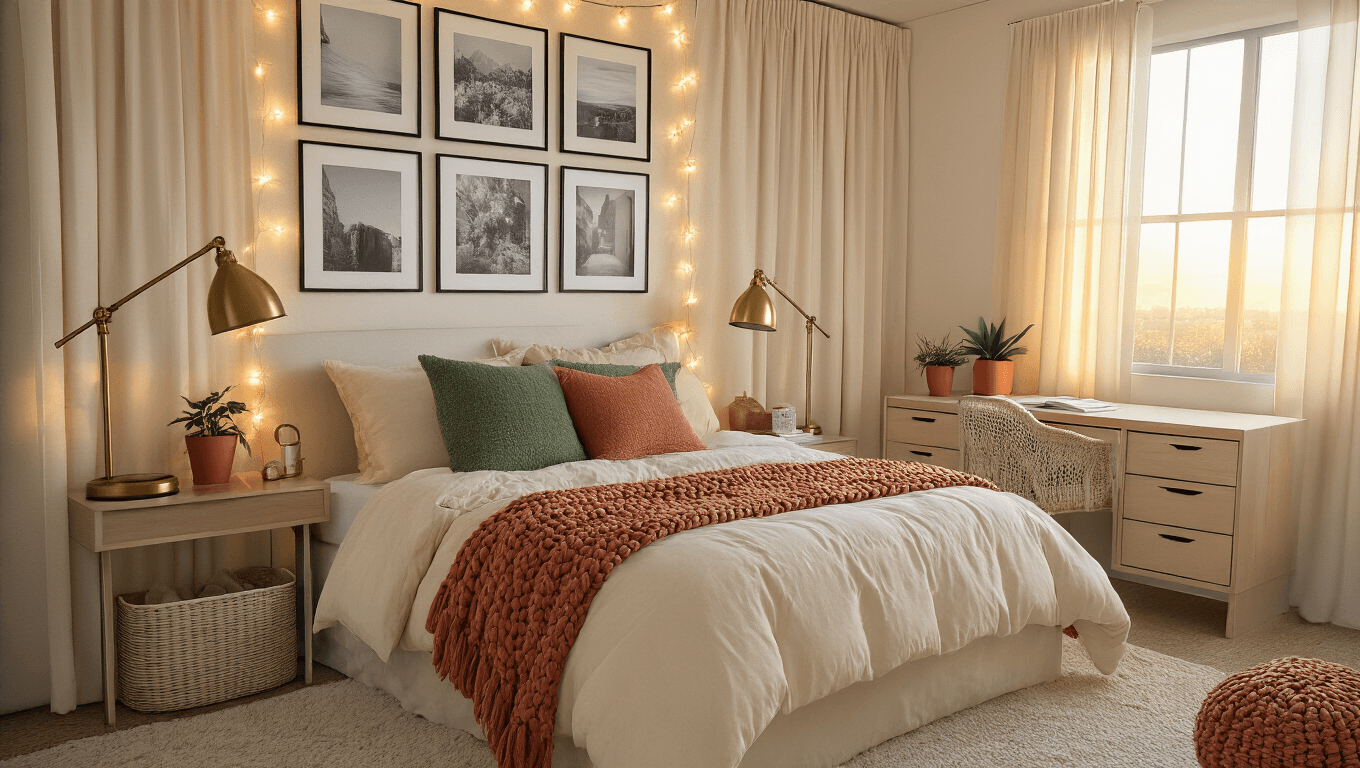
When I shot my last dorm setup, I used cream bedding, sage accents, and terracotta pops. Every single person who walked in said it felt “put together.”

Creating Your Hero Shot: The Bed Wall
Your bed is the biggest surface in the room. It’s your magazine cover, your hero image, your main character.
Layer it like this:
- Neutral duvet or comforter as your base
- Two or three accent pillows in your color palette (odd numbers look better)
- One textured throw folded or draped at the foot—chunky knit, waffle weave, or faux fur work beautifully
Then style the wall behind it.
This is where people either nail it or overthink themselves into blank-wall paralysis.
Pick ONE approach:
- Photo grid: Print 12-20 photos same size, arrange in a clean grid with equal spacing
- Tapestry or fabric panel: Instant backdrop, hides ugly paint, adds softness
- Peel-and-stick wallpaper accent: Commitment-free, removes clean, makes a statement
- String lights + clips: Hang photos, postcards, or art prints along fairy lights
I’ve done all four. The photo grid got the most compliments because it felt personal. The peel-and-stick wallpaper got the most saves on Pinterest because it looked expensive.
Pro move: Whatever you hang, keep it level and use a pack of Command strips so you’re not losing your deposit to nail

")


