
This post may contain affiliate links. Please see my disclosure policy for details.
Fitting a bathtub into a small bathroom presents one of the toughest design challenges homeowners face. While walk-in showers dominate modern powder room renovations, many families still need tub functionality for children, pets, or resale value considerations. The space constraints create real tension between what you want and what actually fits.
Designers approach this challenge differently than most homeowners expect. Instead of choosing finishes first, successful bathroom layouts start with precise measurements and strategic fixture placement. This method ensures every inch of floor space works efficiently before selecting tile patterns or faucet styles.
The bathroom industry offers solutions specifically engineered for tight spaces. Brands like Kohler, American Standard, and Duravit manufacture compact tubs that maintain comfort while reducing footprint. Fixture manufacturers including Delta, Moen, and Grohe design space-saving plumbing systems. Tile companies such as Porcelanosa and TileBar provide visual tricks that make small bathrooms feel more open.
This guide reveals how professional designers maximize limited square footage when a tub is non-negotiable. You’ll learn standard dimensions, layout configurations, and product selections that transform cramped bathrooms into functional spaces. Each strategy addresses both practical requirements and aesthetic goals.
Can You Fit a Tub in a Small Bathroom?
Contents
- Can You Fit a Tub in a Small Bathroom?
- Standard Tub Dimensions for Small Bathrooms
- Best Small Bathroom Layouts With a Tub
- How to Make a Small Bathroom With a Tub Feel Bigger
- Vanity Ideas That Work With Tub Layouts
- Storage Solutions in Small Bathrooms With Tubs
- Best Fixtures for Small Bathroom Tub Layouts
- Lighting Tricks for Small Bathrooms With Tubs
- Mistakes to Avoid in Small Bathroom Tub Layouts
- Cost Considerations for Small Bathroom With Tub Remodels
- Small Bathroom With Tub vs Walk-In Shower — Which Is Better?
- FAQs About Small Bathrooms With Tubs
- Creating Your Ideal Small Bathroom With Tub Layout
- Related Small Bathroom & Remodel Guides
The answer depends entirely on your bathroom’s dimensions and existing plumbing locations. Most small bathrooms measure between 35 and 60 square feet. Within this range, tub installation becomes a careful calculation of minimum clearances and fixture arrangement.
Minimum Space Requirements
Building codes establish baseline clearances for bathroom fixtures. The International Residential Code requires 21 inches of clear space in front of toilets and 24 inches in front of tubs. These measurements aren’t suggestions but legal minimums that ensure safe room movement.
A functional small bathroom with a tub needs at least 5 feet in one direction to accommodate a standard alcove tub. The perpendicular wall requires minimum 7 feet to fit remaining fixtures and maintain code compliance. Bathrooms smaller than 35 square feet rarely accommodate tubs without compromising safety or usability.
Standard Tub Sizes Explained
Tub manufacturers produce fixtures in standardized dimensions that align with typical construction framing. The most common alcove tub measures 60 inches long, 30 inches wide, and 14-16 inches deep. This size fits between standard stud walls spaced for 60-inch openings.
Compact alternatives exist for tighter spaces. Some manufacturers offer 54-inch tubs that save 6 inches of precious floor space. Corner tubs utilize diagonal wall space but often consume more area than they save. Japanese soaking tubs trade length for depth, creating a smaller footprint with increased bathing capacity.
Standard Alcove Tub
- 60 inches long (most common)
- 30-32 inches wide
- 14-16 inches deep
- Fits standard wall framing
Compact Alternatives
- 54-inch short tubs
- Japanese soaking tubs (48″ x 30″)
- Freestanding mini tubs (55-59″)
- European-style narrow tubs (28″ wide)
When a Tub Makes Sense
Real estate market data reveals tubs influence home values in specific situations. Properties in family-oriented neighborhoods typically need at least one tub to compete effectively. Young families with small children view tubs as essential, not optional. The absence of bathing options for toddlers eliminates many potential buyers.
Resale considerations vary by region and target demographic. Urban condos marketed to young professionals often skip tubs entirely. Suburban homes targeting families should maintain at least one full bath with tub capability. Luxury markets expect multiple bathrooms with both tub and separate shower configurations.

When to Skip It
Some bathroom situations favor showers over tubs regardless of space availability. Powder rooms serving only guests never require tubs since visitors don’t bathe in your home. Master bathrooms in homes with additional full baths can prioritize spacious showers over tub-shower combos.
Accessibility needs sometimes override traditional layouts. Aging homeowners benefit more from zero-threshold walk-in showers than tub-shower combinations. The decision depends on long-term plans and physical mobility requirements rather than pure space calculations.
Budget constraints also influence this choice. Tub installations cost more than standard showers due to increased waterproofing requirements and structural considerations. Removing an existing tub and installing a shower typically costs less than tub replacement or relocation.
Standard Tub Dimensions for Small Bathrooms
Understanding exact tub dimensions helps you evaluate what actually fits your space. Manufacturers design bathroom fixtures around standard measurements, but variations exist that can make or break a tight layout. The difference between a 60-inch and 54-inch tub might determine whether your renovation succeeds.
60-Inch Alcove Tubs
The 60-inch alcove tub dominates the bathroom fixture market for good reason. This size fits perfectly between wall studs spaced at standard 60-inch intervals. Most residential construction uses 16-inch on-center stud spacing, making this dimension ideal for retrofit installations.

These tubs typically measure 30-32 inches wide and 14-16 inches deep from floor to overflow drain. The bathing well provides comfortable soaking space for average-height adults. Manufacturers including Kohler and American Standard offer dozens of 60-inch models with varying apron styles and internal contours.
Weight capacity ranges from 250 to 350 pounds for standard models. The tub itself weighs 60-80 pounds empty, increasing to 500-700 pounds when filled with water and a bather. Floor structure must support these loads without flexing or damage.

Kohler Expanse Alcove Tub
This 60-inch alcove tub features a curved lumbar support and integrated tile flange for easier installation. The 30-inch width fits standard openings while providing comfortable bathing depth.
- 60″ x 30″ x 15.5″ dimensions
- Built-in armrests
- Slip-resistant floor
- Integral apron

American Standard Princeton
The Princeton offers reliable performance at an accessible price point. Its traditional rectangular design maximizes bathing area within standard 60-inch framing.
- 60″ x 34″ footprint
- Porcelain enamel finish
- Left or right drain options
- Weight: 77 lbs empty

Sterling Accord
Sterling’s Accord series includes integrated storage niches that eliminate the need for separate shower caddies. The textured floor improves safety in wet conditions.
- 60″ x 30″ standard size
- Built-in shelving
- Textured bottom
- Multiple color options
Compact 54-Inch Tubs
Reducing tub length by 6 inches creates opportunities in extremely tight bathroom layouts. The 54-inch tub saves half a foot of linear space that might accommodate a larger vanity or improved traffic flow. This size works particularly well in bathroom renovations where plumbing relocation isn’t feasible.
The trade-off involves reduced bathing comfort for taller individuals. Adults over 5 feet 8 inches may find 54-inch tubs cramped compared to standard models. However, children and shorter adults won’t notice the difference. These tubs suit guest bathrooms or secondary baths where occasional use is expected.


Kohler Villager 54″
This cast iron option provides durability in a compact footprint. The enamel finish resists scratches and stains better than acrylic alternatives.
- 54″ x 31″ dimensions
- Cast iron construction
- Left-hand drain
- 165 lbs empty weight

American Standard Cambridge
The Cambridge combines affordability with space efficiency. Its acrylic construction keeps weight manageable for easier installation in upper-floor bathrooms.
- 54″ x 32″ footprint
- Acrylic material
- Slip-resistant surface
- Lightweight: 55 lbs
Japanese-Style Soaking Tubs
Japanese soaking tubs reimagine bathing by prioritizing depth over length. These fixtures typically measure 48 inches long but extend 24-28 inches deep. Bathers sit upright rather than reclining, allowing shoulder-deep water immersion in less floor space.
This configuration suits small bathrooms remarkably well. The shorter length opens up floor area for other fixtures while maintaining luxurious bathing capacity. The deep basin creates a spa-like experience that transforms tight spaces into relaxing retreats.

Installation requires careful attention to water heater capacity. Deep tubs consume 60-80 gallons to fill properly. Standard 40-gallon water heaters may not provide sufficient hot water for comfortable use. Tankless systems or larger tanks solve this limitation.

Duravit Architec Soaker
Duravit brings European engineering to Japanese soaking tub design. The square profile maximizes volume within a compact footprint suitable for small bathroom renovations.
- 47″ x 47″ square shape
- 24″ soaking depth
- Ceramic construction
- Center drain placement

Aquatica True Ofuro
This stone composite tub retains heat exceptionally well, maintaining water temperature throughout extended soaking sessions. The ergonomic seat provides comfortable upright positioning.
- 51″ x 35″ dimensions
- 28″ depth for deep soaking
- Stone composite material
- Excellent heat retention
Freestanding Mini Tubs
Freestanding tubs offer design flexibility but rarely save actual space. Most models require clearance on all sides for cleaning and aesthetic appeal. This perimeter access consumes more floor area than alcove installations that nestle against walls.
Mini freestanding tubs measuring 55-59 inches work in specific layout scenarios. When positioned against one wall, they function similarly to alcove tubs while providing a focal point design element. The exposed sides must complement rather than obstruct the bathroom flow.

Plumbing considerations differ significantly from built-in tubs. Floor-mounted or wall-mounted tub fillers replace traditional deck-mounted faucets. Drain placement must align with existing rough-in locations or require expensive plumbing relocation. These factors often add $500-$1500 to installation costs.

Woodbridge 59″ Freestanding
This contemporary freestanding tub provides visual appeal in a size that works for smaller bathrooms. The high-gloss finish and curved lines create an upscale look without excessive bulk.
- 59″ x 30″ footprint
- Acrylic construction
- Integrated slotted overflow
- Adjustable leveling legs

FerdY 55″ Slipper Tub
The slipper design elevates one end for comfortable reclining despite the shorter length. This model suits small bathroom layouts where visual lightness matters as much as function.
- 55″ x 27″ compact size
- Raised back for support
- Glossy white finish
- Center drain configuration
Best Small Bathroom Layouts With a Tub
Layout configuration determines whether a small bathroom feels cramped or comfortable. The same fixtures arranged differently create vastly different user experiences. These five layouts represent the most effective approaches designers use when space is limited but tub functionality is required.
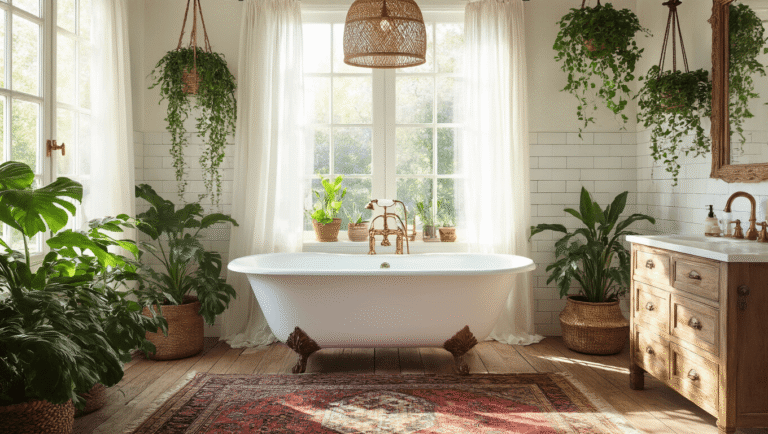
1. Classic Alcove Tub Layout
The alcove layout positions the tub along one wall with the toilet and vanity on adjacent or opposite walls. This arrangement has dominated residential bathroom design for decades because it efficiently uses rectangular room shapes. The tub anchors the space while leaving maximum floor area open for movement.

Tub placement along the back wall typically works best. This position puts plumbing fixtures on common walls, simplifying supply and drain line routing. The toilet usually sits on the wall perpendicular to the tub, maintaining required clearances. The vanity occupies the remaining wall or shares space opposite the toilet.
Door placement critically affects this layout’s success. Doors should swing into the bathroom rather than out, preserving hallway space. The door must clear all fixtures when fully open. In extremely tight spaces, pocket doors eliminate swing radius requirements entirely.
Optimal Alcove Placement
Position the tub along the longest wall when possible. This arrangement leaves maximum width for toilet and vanity placement. The perpendicular walls provide 21-24 inches of clearance required by code.
Key Measurements
- Minimum room width: 5 feet
- Minimum room length: 7-8 feet
- Tub clearance: 24 inches minimum
- Toilet clearance: 21 inches from center
- Vanity depth: 18-21 inches typical
- Door swing: 30-32 inches wide
Toilet Placement Strategies
Toilet positioning requires careful consideration of clearances and visual privacy. Building codes mandate 15 inches from the toilet centerline to any wall or fixture. This measurement ensures adequate space for users and cleaning access.
Privacy concerns influence toilet placement decisions. Positioning the toilet perpendicular to the entry door prevents direct sightlines from hallways when doors open. Corner placement works in some layouts but can feel cramped. Wall-mounted toilets from manufacturers like Geberit save 6-9 inches of floor space by concealing tanks in walls.

Kohler Memoirs Complete Kit
This kit includes everything needed for alcove installation in classic bathroom layouts. The integrated flange simplifies waterproofing during tile work.
- 60″ alcove tub included
- Tile flange system
- Drain and overflow assembly
- Installation instructions
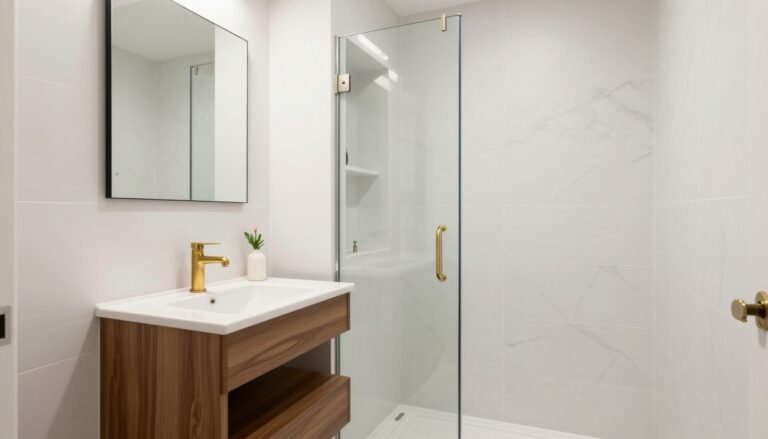
2. Tub-Shower Combo Layout
Combining tub and shower functionality in one fixture maximizes utility in limited space. This layout dominates small bathroom design because it serves multiple user needs without requiring separate bathing areas. The shower component typically mounts above the tub with either curtain or glass enclosure.

Curtain vs Glass Enclosures
Shower curtains offer the most flexible and economical option. They cost $20-$150 compared to $300-$2000 for glass installations. Curtains easily change during bathroom updates without professional help. However, curtains trap moisture and require regular replacement due to mildew growth.
Glass enclosures create cleaner lines and more substantial visual appeal. Frameless glass panels make spaces feel open compared to curtains that visually divide rooms. Glass requires more upfront investment but lasts decades with proper maintenance. Water spots and soap buildup demand regular cleaning to maintain clarity.
Glass Enclosure Benefits
- Creates open, spacious feeling
- Lasts 20-30 years with care
- Increases perceived bathroom value
- Easier to clean than textured curtains
- Prevents water splashing beyond tub
Glass Enclosure Drawbacks
- Higher upfront cost ($500-$2000)
- Professional installation required
- Water spots require frequent cleaning
- Glass breaks under impact
- Difficult to modify after installation
Sliding Doors vs Fixed Panels
Sliding doors work best in bathrooms with limited floor space. The doors travel along tracks rather than swinging outward, eliminating clearance requirements. This design suits narrow bathrooms where door swing would interfere with toilets or vanities positioned nearby.
Fixed panels with hinged doors create more elegant appearances but need swing clearance. The door must open without hitting toilets or other fixtures. In very small bathrooms, this requirement often makes sliding doors the only practical choice. Modern minimal hardware from brands like Kohler and DreamLine reduces visual bulk.

Linear Drain Options
Linear drains create sleeker shower floors compared to traditional center drains. These elongated grates sit flush with tile, allowing larger format tiles without complicated cutting. The linear design also improves water drainage by creating a single slope direction rather than a cone-shaped slope to a center point.
Installation requires precise slope calculation during substrate preparation. The floor must pitch consistently toward the drain channel, typically 1/4 inch per foot. Improper slope causes standing water and potential moisture damage. Professional installation ensures correct pitch and waterproofing membrane integration.

Delta Lahara Tub-Shower Combo
This complete system provides coordinated styling between tub and shower functions. The Monitor pressure-balance valve maintains consistent water temperature during use.
- Pressure-balance valve included
- Chrome or stainless finishes
- H2Okinetic shower head
- Integrated diverter

DreamLine Enigma-X Sliding Door
This frameless sliding system maximizes space efficiency while providing elegant aesthetics. The smooth gliding mechanism and minimal hardware suit contemporary bathroom designs.
- Frameless 3/8″ glass
- Sliding bypass design
- Stainless steel hardware
- Fits 60″ tub openings

Moen Genta Shower System
Moen’s pressure-balancing system prevents temperature fluctuations when other fixtures operate. The single-handle design simplifies temperature control during bathing.
- PosiTemp valve technology
- Single-handle operation
- Multiple finish options
- WaterSense certified
3. Corner Tub Layout (When It Works)
Corner tubs seem like space-saving solutions but often consume more area than standard alcove designs. The diagonal placement requires significant width and depth to accommodate the tub’s angled footprint. This layout works best in square or near-square bathroom floor plans where corner utilization makes sense.

Space-Saving Corner Placement
The corner configuration frees up wall space that standard tubs occupy. This liberated wall area accommodates wider vanities or additional storage cabinets. In bathrooms with awkward dimensions, corner tubs sometimes solve layout puzzles that defeat conventional arrangements.
However, corner tubs demand adequate room dimensions to function properly. Most models need 5 feet of width and depth along both adjacent walls. Smaller bathrooms rarely benefit from corner tubs despite their space-saving reputation. The diagonal orientation also creates dead space in corners that’s difficult to utilize effectively.
Storage Around Tub Deck
Corner tub installations often include built-in deck areas that provide valuable storage. These platforms accommodate bath products, candles, and decorative elements. The deck should measure at least 6-8 inches wide to hold items securely without tipping into the bath water.

Deck construction must properly waterproof to prevent moisture damage. Tile installations require cement board substrate and waterproof membrane beneath finish surfaces. Grout lines need regular sealing to maintain water resistance. Poor waterproofing leads to rot and structural damage behind finished surfaces.
Pros and Cons Analysis
Corner Tub Advantages
- Frees wall space for other fixtures
- Creates unique focal point
- Built-in deck provides storage
- Works in square room layouts
- Larger bathing capacity than alcove tubs
Corner Tub Disadvantages
- Requires larger room dimensions
- Creates unusable corner dead space
- More expensive than standard tubs
- Difficult to clean behind and around
- May not suit rectangular bathrooms

American Standard Cadet Corner
This symmetrical corner design provides spacious bathing in a compact footprint. The integral armrests and built-in soap dishes enhance functionality.
- 60″ x 60″ corner size
- Acrylic construction
- Center drain placement
- Built-in armrests
4. Wet Room Style Layout
Wet rooms eliminate traditional shower enclosures entirely by waterproofing the complete bathroom space. The tub sits within a fully tiled environment where walls and floor drain properly without separate shower barriers. This European-inspired approach creates seamless, spa-like atmospheres ideal for small bathroom spaces.

Floor-to-Ceiling Tile
Complete tile coverage from floor to ceiling creates the waterproof envelope necessary for wet room function. Large format tiles reduce grout lines that require maintenance. Porcelain tiles from brands like Porcelanosa and TileBar resist moisture better than natural stone options that need regular sealing.
Tile selection influences the room’s visual perception. Light colors reflect natural light and make small spaces feel open. Matte finishes provide better traction when wet compared to polished surfaces. The tile should extend consistently across all surfaces without pattern interruptions that fragment the visual field.
Drain Placement Strategy
Wet rooms require carefully positioned floor drains that capture water from the entire space. Linear drains along one wall work better than center drains in rectangular bathrooms. The floor must slope uniformly toward the drain, typically 1/4 inch per foot, to prevent standing water.

Multiple drains sometimes benefit larger wet rooms or those with complex floor plans. Each drain requires individual plumbing connections and proper venting. The additional plumbing complexity increases installation costs but improves drainage performance.
Seamless Look Benefits
Removing visual barriers between bathing zones creates psychological spaciousness. Without shower doors or curtains dividing the room, sight lines extend fully across the space. This openness counteracts the physical constraints of small bathroom dimensions.
The seamless aesthetic also simplifies cleaning and maintenance. No door tracks collect grime or curtain hems develop mildew. Tile surfaces wipe clean with minimal effort. This practical advantage appeals to homeowners seeking low-maintenance bathroom solutions.

Schluter Kerdi Wet Room Kit
This complete waterproofing system provides everything needed for professional wet room construction. The membrane prevents water penetration while allowing proper drainage.
- Complete membrane system
- Linear drain included
- Bonding materials
- Installation instructions

Porcelanosa Bottega Series Tile
These large format porcelain tiles create seamless surfaces ideal for wet room applications. The matte finish provides slip resistance while maintaining elegant aesthetics.
- 24″ x 48″ large format
- Porcelain material
- Matte finish for safety
- Multiple color options
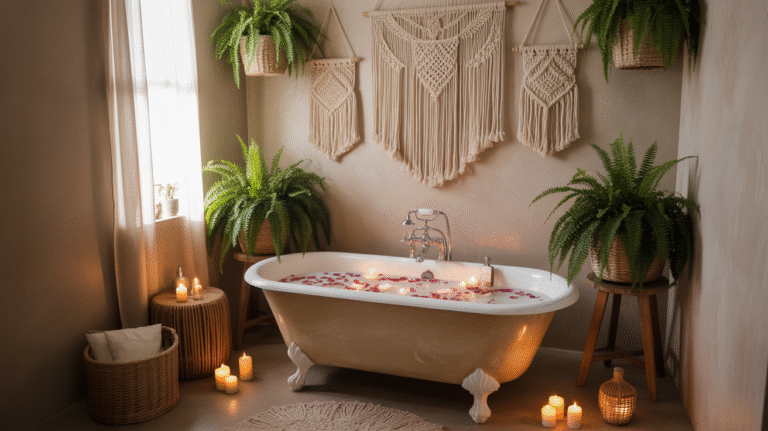
5. Japanese Soaking Tub Layout
Japanese soaking tubs enable luxurious bathing experiences in remarkably small footprints. The compact dimensions and deep basins suit bathrooms where standard tubs won’t fit. This layout works particularly well in urban homes or older buildings with space constraints.
Deep But Compact Footprint
The typical Japanese soaking tub measures 48 inches long but extends 24-28 inches deep. Bathers sit upright with water reaching shoulder height. This vertical orientation uses less floor space than reclining designs while providing superior relaxation benefits.
The compact length frees up wall space for expanded vanities or storage solutions. A bathroom that can’t accommodate a 60-inch standard tub often fits a 48-inch soaking model comfortably. The saved space makes meaningful differences in tight quarters.
Ideal for Ultra-Small Bathrooms
Bathrooms under 50 square feet rarely accommodate traditional tubs without sacrificing other essential fixtures. Japanese soaking tubs solve this dilemma by reducing length requirements by 12-24 inches. The space savings allow proper toilet and vanity placement while maintaining bathing capability.
The elevated water depth requires appropriate water heating capacity. Standard tank water heaters may struggle to fill deep tubs with adequately hot water. Tankless systems or larger capacity tanks address this requirement. Consider water heater upgrades when planning Japanese soaking tub installations.
Spa-Like Feel in Tiny Rooms
The deep immersion creates resort-quality experiences despite limited square footage. The upright seating position encourages meditation and relaxation different from traditional bathing. Natural materials like teak or hinoki wood enhance the spa atmosphere, though they require regular maintenance to prevent water damage.
Surrounding finishes should support the zen aesthetic. Natural stone tiles, bamboo accents, and minimal hardware reinforce the Japanese design philosophy. Clean lines and uncluttered surfaces maximize the perception of space while maintaining the tranquil atmosphere.

Hydro Systems Maestro Soaker
This deep soaking design provides authentic Japanese bathing in a compact package. The built-in seat and armrests enhance comfort during extended soaking sessions.
- 48″ x 32″ compact size
- 26″ soaking depth
- Built-in seating
- Acrylic construction

Kohler Underscore Soaker
Kohler adapts Japanese soaking principles to Western bathrooms. The rectangular design fits standard alcove installations while providing deep immersion bathing.
- 60″ x 30″ standard footprint
- 19″ extra-deep basin
- Sloped lumbar support
- Integral tile flange
How to Make a Small Bathroom With a Tub Feel Bigger
Physical space limitations can’t change, but perception manipulation creates psychological spaciousness. Designers employ specific visual strategies that trick the eye into perceiving more room than actually exists. These techniques work independently but combine for maximum impact in small bathroom renovations.

Large-Format Tile
Bigger tiles mean fewer grout lines interrupting visual flow. A bathroom tiled with 12×24-inch planks appears more expansive than one covered in 4×4-inch mosaics. The reduced grout joint frequency creates continuous surfaces that read as larger planes.
Large format tiles also simplify maintenance by reducing grout cleaning requirements. Fewer joints mean less area where mildew develops and soap scum accumulates. This practical advantage complements the aesthetic benefits of unified surfaces.
Installation requires perfectly flat substrates to prevent lippage between tiles. Large format tiles telegraph every imperfection in the underlying surface. Professional installation typically costs more due to careful substrate preparation and specialized setting materials required.
Vertical Tile Layouts
Running tile vertically draws the eye upward, creating perceived height in rooms with standard 8-foot ceilings. This orientation works particularly well with rectangular format tiles like 12×24-inch planks. The vertical emphasis counteracts the horizontal compression small bathrooms often exhibit.

Stack bond patterns enhance the vertical effect by aligning grout lines in continuous columns. Traditional running bond patterns create diagonal visual movement that works against the vertical emphasis. However, stack bond installations require precise execution to avoid obviously misaligned joints.
Matching Floor and Shower Tile
Continuous flooring materials eliminate visual breaks between wet and dry zones. When floor tile extends into the shower area without pattern changes, the bathroom reads as unified space. This continuity makes the room feel larger than designs that separate zones with different materials.
The approach works best with slip-resistant tiles suitable for wet areas. Matte finish porcelain provides safety without sacrificing the seamless aesthetic. Glossy tiles create beautiful showrooms but dangerous wet surfaces that require textured alternatives in actual installations.

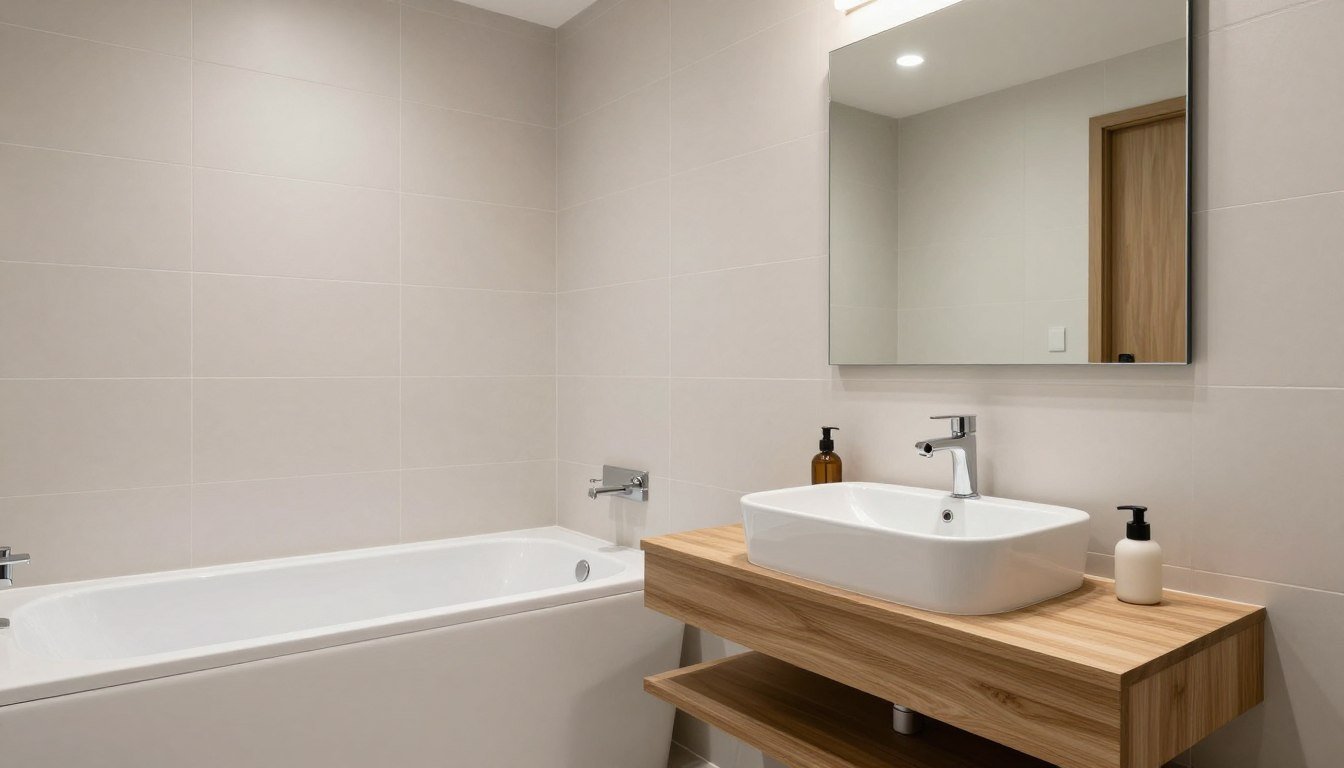
Floating Vanity Benefits
Wall-mounted vanities expose floor area that floor-standing cabinets conceal. The visible floor space creates airiness despite identical functional capacity. This visual trick proves remarkably effective in small bathroom environments where every perceived inch matters.
The floating design also simplifies floor cleaning by eliminating tight spaces around cabinet bases. Dust and moisture can’t accumulate in unreachable corners. This maintenance advantage appeals to homeowners beyond the aesthetic considerations.
Installation requires proper wall blocking for adequate support. Standard drywall can’t support vanity loads alone. Wood blocking between studs during construction, or post-construction toggle bolts, provide necessary strength. Professional installation ensures structural adequacy for daily use.

VIGO Othello Floating Vanity
This 30-inch floating vanity provides essential storage without consuming floor space. The wall-mounted design creates visual lightness crucial for small bathroom aesthetics.
- 30″ width for compact spaces
- Soft-close drawers
- Integrated ceramic sink
- White or gray finishes

TileBar Concrete Collection
These 24×48-inch porcelain planks create expansive surfaces with minimal grout interruption. The matte finish provides safety while large format visually enlarges small bathrooms.
- 24″ x 48″ large format
- Matte finish for traction
- Porcelain durability
- Light neutral colors
Wall-Mounted Toilets
Wall-hung toilets from manufacturers like Geberit conceal tanks within wall cavities, saving 6-9 inches of floor space. The streamlined profile creates modern aesthetics while improving cleaning access. The exposed floor beneath wall-mounted fixtures contributes to spaciousness perception.
These systems require more complex installation than traditional floor-mounted toilets. The in-wall carrier must attach to proper blocking and support the toilet weight plus user loads. Professional installation costs typically run $200-$400 higher than standard toilets due to this complexity.

Repair access requires removable panels or careful planning during construction. The concealed tank contains all mechanical components that occasionally need service. Design these access points thoughtfully to maintain aesthetic integrity while allowing necessary maintenance.

Geberit Wall-Hung Toilet System
This complete system includes the in-wall carrier, tank, and toilet bowl. The space-saving design proves ideal for small bathroom layouts requiring maximum efficiency.
- Complete carrier system
- Dual-flush mechanism
- Wall-mounted design
- Standard height or comfort height
Vanity Ideas That Work With Tub Layouts
Vanity selection dramatically impacts small bathroom functionality and aesthetics. The right vanity provides necessary storage without overwhelming limited space. Choosing appropriate depth, mounting style, and sink configuration makes the difference between cramped and comfortable bathroom experiences.

Slim-Depth Vanities
Standard vanities measure 21 inches deep, consuming significant floor space in small bathrooms. Slim-depth alternatives at 16-18 inches provide essential functions while preserving movement areas. The reduced projection creates noticeable improvements in tight quarters.
These compact vanities sacrifice some storage capacity compared to full-depth models. However, smart interior organization maximizes the available volume. Drawer organizers, pull-out trays, and vertical dividers transform shallow spaces into surprisingly functional storage.
Sink selection influences slim vanity effectiveness. Integrated sinks molded into the countertop consume less depth than vessel sinks sitting atop the surface. Undermount sinks also work well, though installation complexity increases with solid surface or stone countertops.
Wall-Mounted Vanities
Floating vanities serve dual purposes in small bathroom with tub layouts. They reduce visual bulk by exposing floor surfaces while providing functional storage. The open space beneath simplifies cleaning and creates psychological spaciousness crucial in compact environments.

Wall mounting requires structural consideration during installation. The vanity loads concentrate on mounting points rather than distributing across floor surfaces. Proper blocking between wall studs ensures adequate support for daily use and prevents catastrophic failures.
Plumbing access differs from floor-standing vanities. Supply and drain lines typically run within walls rather than through vanity backs. This approach creates cleaner aesthetics but complicates future plumbing modifications. Plan plumbing rough-in carefully during initial installation.
Integrated Sinks
One-piece vanity tops with integral sinks eliminate joints where water and grime accumulate. The seamless design simplifies cleaning and creates sleek modern aesthetics. Materials including solid surface, cultured marble, and composite resins enable integrated sink construction.
These tops cost more initially than separate sink and countertop installations. However, the durability and low maintenance characteristics offset higher upfront expenses. Scratches and stains often disappear with light sanding on solid surface materials, extending functional life significantly.

Drawer vs Cabinet Storage
Drawer-based vanities provide superior organization compared to cabinet-door designs. Full-extension drawer slides allow complete access to contents without reaching into dark cabinet depths. This accessibility matters enormously in compact spaces where every stored item must remain easily retrievable.
Cabinet configurations cost less than drawer systems due to simpler hardware requirements. Simple hinged doors require minimal mechanical components compared to drawer slides and supporting structures. Budget-conscious renovations often choose cabinet vanities despite functional compromises.
Hybrid designs combine both approaches, using drawers for frequently accessed items and cabinets for bulk storage. This strategy balances cost with functionality. Upper drawers store toiletries and cosmetics while lower cabinets hold cleaning supplies and extra towels.

Duravit DuraStyle Compact Vanity
This European-designed vanity excels in tight spaces with its 18-inch depth. The integrated sink and soft-close drawers provide luxury features in a space-efficient package.
- 32″ width x 18″ depth
- Wall-mounted installation
- Integrated ceramic sink
- Soft-close drawer

Kohler Jute Vanity 30″
Kohler’s Jute series combines warmth with functionality. The 18.5-inch depth saves space while maintaining adequate storage for essential bathroom items.
- 30″ x 18.5″ compact footprint
- Natural wood finish
- Two full-extension drawers
- Integrated sink top available

IKEA Godmorgon Vanity System
IKEA’s modular approach allows custom configurations for unique small bathroom layouts. The wall-mounted design and slim 16-inch depth maximize tight spaces effectively.
- Multiple width options
- 16″ slim depth available
- Modular drawer systems
- Custom front options
Storage Solutions in Small Bathrooms With Tubs
Adequate storage separates functional bathrooms from cluttered disasters. Small spaces demand creative solutions that maximize vertical areas and utilize forgotten zones. Strategic storage planning prevents counter surfaces from becoming jumbled messes of toiletries and towels.

Built-In Shower Niches
Recessed niches carved into shower walls provide storage without consuming floor or wall space. These alcoves typically measure 12-16 inches wide and 4-6 inches deep, perfectly sized for shampoo bottles and soap bars. The built-in approach eliminates hanging caddies that clutter visual fields.
Installation during construction or renovation requires proper planning. The niche must sit between wall studs or use horizontal blocking for structural support. Waterproofing becomes critical, as the recessed areas expose more surface area to direct water spray.

Tile installation in niches demands precision. The bottom should slope slightly toward the shower to prevent water pooling. Corner shelves work where stud spacing prevents standard rectangular niches. These diagonal configurations utilize otherwise wasted corner space effectively.
Recessed Medicine Cabinets
Medicine cabinets installed between wall studs provide substantial storage without projection into the bathroom space. Modern designs feature LED lighting, electrical outlets, and defoggers integrated into mirror surfaces. These multifunction units replace simple mirrors while adding valuable capability.
The recessed installation limits cabinet depth to stud cavity dimensions, typically 3.5 inches for 2×4 walls. This shallow depth accommodates most toiletries and medications adequately. Wider cabinets spanning multiple stud bays increase capacity significantly.
Installation requires cutting drywall and possibly removing one wall stud. Load-bearing wall considerations become important in some situations. Professional installation ensures structural integrity while achieving desired storage capacity.

Kohler Verdera Medicine Cabinet
This recessed cabinet combines mirrored storage with integrated LED lighting. The 24-inch width fits standard stud spacing while providing ample capacity for bathroom essentials.
- 24″ x 30″ recessed size
- LED perimeter lighting
- Adjustable glass shelves
- Soft-close hinges

Schluter Kerdi-Board Niche
Pre-formed niches simplify waterproof installation in shower areas. The bonded waterproof membrane eliminates complex membrane folding required with site-built alternatives.
- 12″ x 28″ standard size
- Bonded waterproof membrane
- Centered drain shelf
- Ready for tile installation
Over-Toilet Storage Done Right
The area above toilets offers valuable vertical storage potential often ignored in bathroom designs. Properly designed over-toilet cabinets or open shelving units provide capacity without interfering with toilet use. The key involves maintaining adequate clearance for comfortable seating and standing.
Minimum clearances matter significantly. The lowest shelf should sit at least 24 inches above the toilet tank to prevent head contact when users stand. Cabinet depth shouldn’t exceed 10-12 inches to avoid creating oppressive overhang feelings.

Open shelving versus closed cabinets presents stylistic choices. Open shelves create airier feelings but expose stored items to view. This arrangement demands tidy organization and attractive storage containers. Closed cabinets conceal clutter but add visual weight in small rooms.
Custom Millwork Between Studs
Empty wall cavities between studs present hidden storage opportunities. Custom shelving or narrow cabinets fitted between framing members utilize otherwise wasted space. This approach works particularly well in bathrooms with plumbing walls where added depth already exists.
The standard 14.5-inch cavity width between 16-inch on-center studs accommodates surprisingly useful storage. Narrow shelves hold toiletries, rolled towels, and cleaning supplies. Glass or open shelving keeps sight lines clear while maximizing storage density.
Installation requires careful planning during renovation or new construction. Once drywall installation completes, accessing stud bays becomes more difficult. Plan these features early in the design process for easiest implementation.

Zenna Home Over-Toilet Spacesaver
This freestanding unit provides three tiers of storage without permanent installation. The open design maintains visual lightness crucial in small bathroom spaces.
- Three adjustable shelves
- Fits standard toilets
- Easy assembly required
- White or chrome finishes

Fox Hollow Furnishings Recessed Shelf
These custom-sized recessed shelving units fit between standard wall studs. The flush installation preserves wall space while adding functional storage capacity.
- Fits 16″ stud spacing
- Multiple height options
- Primed for painting
- Recessed 3.5″ depth
Best Fixtures for Small Bathroom Tub Layouts
Fixture selection influences both functionality and aesthetics in small bathroom environments. The right faucets, shower systems, and valves optimize limited space while providing reliable performance. Quality fixtures from established manufacturers also increase home value and reduce long-term maintenance costs.

Tub Fillers vs Wall-Mounted Faucets
Deck-mounted tub fillers sit on the tub rim or surrounding deck surfaces. These traditional configurations work well with alcove tubs where the deck provides mounting surfaces. The location puts controls within easy reach during bathing.
Wall-mounted faucets attach to the wall above the tub, freeing up tub deck space. This approach suits freestanding tubs and modern minimalist designs. The elevated position creates cleaner lines and simplifies tub deck cleaning. However, installation requires precise plumbing rough-in during wall construction.

Floor-mounted tub fillers provide another option for freestanding tubs. These statement fixtures create dramatic focal points but require floor-level plumbing connections. The exposed supply lines must integrate aesthetically with bathroom design rather than hiding behind walls.
Shower System Combos
Complete shower systems with coordinated components simplify specification and ensure compatible finishes. These packages typically include shower head, hand shower, diverter valve, and trim. The unified design creates cohesive aesthetics while guaranteeing component compatibility.
Thermostatic valves maintain consistent water temperature better than pressure-balance alternatives. When someone flushes a toilet or starts the dishwasher, thermostatic systems adjust automatically to maintain set temperatures. This protection prevents scalding during temperature fluctuations.
Multi-function systems combine overhead rain heads with handheld sprayers. The dual functionality serves different bathing preferences and practical needs like rinsing the tub. Diverter valves allow switching between outlets or using both simultaneously depending on system design.

Delta Trinsic Tub-Shower System
This complete system provides coordinated components in contemporary styling. The H2Okinetic technology creates fuller spray patterns while conserving water.
- Complete coordinated system
- Monitor pressure-balance valve
- Shower head plus hand shower
- Multiple finish options

Moen Align Wall-Mount Tub Filler
Moen’s wall-mounted design saves tub deck space while providing elegant contemporary styling. The single-handle operation simplifies temperature control.
- Wall-mounted installation
- Single-handle control
- LifeShine finish warranty
- 1.5 GPM flow rate

Grohe Grohtherm Shower System
Grohe’s German engineering delivers precise temperature control and luxurious spray patterns. The thermostatic valve prevents scalding during water pressure fluctuations.
- Thermostatic temperature control
- 10-inch rain shower head
- Multi-function hand shower
- TurboStat technology
Compact Valve Systems
Shower valve selection impacts installation complexity and ongoing reliability. Pressure-balance valves prevent temperature spikes when water pressure changes elsewhere in the home. These code-required devices protect users from scalding but can’t prevent cold water surges.
Thermostatic valves provide superior performance by mixing hot and cold water to maintain exact set temperatures. Internal components adjust automatically as supply temperatures fluctuate. This precision justifies higher costs for homeowners prioritizing comfort and safety.

Valve trim kits determine the visible styling while separate valve bodies handle functional requirements. This separation allows updating bathroom aesthetics without replumbing. The modularity proves valuable during future renovations when style preferences change.
Finish Coordination
Consistent finishes across all fixtures create cohesive design schemes. Mixing metals can work when done intentionally, but requires careful selection to avoid chaotic appearances. Most designers recommend choosing one primary finish with optional accent pieces in complementary tones.
Chrome remains the most popular and affordable finish option. The bright, reflective surface complements most color schemes and resists water spots reasonably well. Chrome fixtures typically cost 20-40% less than premium finishes like brushed nickel or oil-rubbed bronze.
Matte black fixtures have surged in popularity for contemporary bathroom designs. The bold contrast creates striking visual impact in light-colored spaces. However, water spots and fingerprints show prominently on dark matte surfaces, demanding more frequent cleaning.
Brushed nickel and brushed gold offer warmth while hiding water spots better than chrome. These satin finishes suit traditional and transitional design styles. The subtle texture diffuses reflections, creating softer appearances than polished alternatives.

Hansgrohe Ecostat Valve System
This German-engineered valve combines precise thermostatic control with elegant design. The Select button operation provides intuitive control of water flow and temperature.
- Thermostatic temperature limiter
- Two-outlet diverter
- Select button technology
- Multiple finish options

Brizo Litze Collection
Brizo’s Litze series exemplifies contemporary luxury with industrial-inspired design. The articulating joints provide both function and distinctive styling.
- Matte black finish
- Articulating spout design
- Coordinated tub and shower
- Lifetime warranty
Lighting Tricks for Small Bathrooms With Tubs
Lighting transforms small bathrooms more dramatically than any other single element. Proper illumination makes spaces feel larger, safer, and more luxurious. Strategic lighting planning addresses both functional task requirements and aesthetic ambiance goals.

Layered Lighting Strategy
Effective bathroom lighting combines three distinct layers: ambient, task, and accent. Ambient lighting provides overall illumination throughout the space. Task lighting focuses on specific areas like vanity mirrors where detailed activities occur. Accent lighting highlights architectural features or creates mood.
Relying on a single central ceiling fixture creates harsh shadows and inadequate task illumination. This common mistake leaves faces poorly lit in mirrors and creates gloomy corners. Layer multiple light sources at different heights to eliminate shadows and dark zones.
Dimmers allow adjusting intensity based on time of day and activity. Bright task lighting suits morning routines while softer ambient levels create relaxing evening bath atmospheres. Installing dimmers adds minimal cost during electrical work but significantly enhances lighting flexibility.
Wall Sconces vs Overhead Lighting
Wall sconces mounted on either side of vanity mirrors provide superior face lighting compared to overhead fixtures. The side-mounted position eliminates shadows under eyes, nose, and chin that top-down lighting creates. This placement proves essential for grooming tasks requiring accurate reflection viewing.

Sconce height matters significantly. Position fixtures at 60-70 inches above the floor, roughly at eye level for standing users. This elevation provides flattering illumination without glare. The fixtures should mount 28-36 inches apart for single-sink vanities.
Overhead recessed lighting supplements sconces for general ambient illumination. These fixtures should use soft white bulbs rather than daylight temperatures that feel cold in residential spaces. Avoid installing recessed cans directly over where users stand at the vanity, as this creates unflattering downward shadows.
Backlit Mirrors
LED-backlit mirrors combine task lighting and mirrors into single integrated fixtures. The perimeter lighting creates even, shadow-free illumination ideal for grooming activities. Built-in defoggers prevent steam buildup, maintaining clear reflection visibility after showers.
These fixtures consume less energy than separate lights and mirrors while providing superior functionality. LED technology lasts 25,000-50,000 hours compared to incandescent bulbs needing replacement every 1,000-2,000 hours. The long life eliminates maintenance hassles in hard-to-access installations.

Color rendering index (CRI) affects how accurately colors appear under artificial light. LED mirrors with CRI ratings above 90 show skin tones and makeup colors true to natural daylight. Lower CRI values create color distortions that complicate grooming tasks.
2700K–3000K Warm Lighting
Color temperature measured in Kelvin significantly impacts bathroom ambiance. The 2700K-3000K range produces warm white light similar to traditional incandescent bulbs. This temperature creates comfortable, inviting atmospheres appropriate for residential bathrooms.
Cooler temperatures above 4000K produce clinical, institutional feelings unsuitable for home environments. The blue-white light feels harsh and unwelcoming despite providing excellent visibility. Reserve daylight temperature bulbs (5000K-6500K) for workshops and garages rather than bathrooms.
Consistency matters across all lighting sources. Mixing warm and cool light temperatures creates unpleasant visual confusion. Choose the same color temperature for all bulbs throughout the bathroom space.

Visual Comfort Presidio Sconce
This designer-quality sconce provides elegant styling with excellent light distribution. The frosted glass shade diffuses light evenly while the aged brass finish adds warmth to small bathrooms.
- 13″ height for proper placement
- Aged brass finish
- Frosted glass diffuser
- Damp location rated
Keonjinn LED Backlit Mirror
This LED mirror combines energy-efficient illumination with modern aesthetics. The anti-fog function and touch controls add convenience for daily bathroom routines.
- 36″ x 28″ size
- 3000K warm white LED
- Built-in defogger
- Touch sensor controls

Kichler Winslow Vanity Light
Kichler’s Winslow series offers quality construction at accessible prices. The clean lines suit contemporary small bathroom designs while providing ample task lighting.
- 24″ three-light configuration
- Brushed nickel finish
- Compatible with LED bulbs
- Dimmable when used with appropriate bulbs
Mistakes to Avoid in Small Bathroom Tub Layouts
Common planning mistakes turn potentially functional small bathrooms into frustrating spaces. These errors typically stem from overlooking practical requirements in favor of aesthetic preferences. Avoiding these pitfalls saves money and prevents renovation regrets.

Oversized Vanities
Choosing vanities too large for available space creates cramped movement areas and awkward traffic flow. The vanity often represents the most flexible fixture regarding size options. Toilets and tubs have standardized dimensions, but vanities range from 18 to 72 inches wide.
A vanity measuring 36 or 48 inches might seem reasonable until installed in a 5-foot-wide bathroom. The seemingly minor size difference dramatically affects usable floor space. Prioritize adequate clearances over extra cabinet storage that ultimately goes unused.
Depth considerations matter as much as width. Standard 21-inch-deep vanities project substantially into small bathrooms. Slim-depth 16-18 inch alternatives preserve movement space while maintaining essential function. The depth reduction proves more valuable than any lost storage capacity.
Blocking Natural Light
Window placement and size influence perceived bathroom spaciousness significantly. Frosted or obscured glass maintains privacy while admitting natural light. Completely blocking windows with opaque treatments creates cave-like feelings that exaggerate small dimensions.

Fixture placement should preserve natural light flow rather than obstruct it. Avoid positioning tall storage units or shower enclosures directly in front of windows. Side-mounted vanities or strategic mirror placement can reflect and distribute natural light throughout the space.
Bulky Framed Shower Doors
Heavy aluminum-framed shower doors create visual bulk that fragments small bathrooms. The thick frames and opaque bottom rails draw attention and block sight lines. This outdated styling makes already-small spaces feel more confined.
Frameless or semi-frameless glass enclosures provide contemporary aesthetics with practical benefits. The minimal hardware disappears visually, allowing clear views across the entire bathroom. The transparent glass creates continuous sight lines that make spaces feel significantly larger.
Clear glass outperforms frosted or patterned alternatives in space perception. While textured glass offers privacy, it fragments visual fields and emphasizes enclosure boundaries. In small bathrooms where privacy is less critical, clear glass maximizes openness.
Poor Drain Placement
Drain location affects both functionality and installation cost. Ideally, drains align with existing plumbing rough-in locations. Moving drains requires breaking concrete slabs or rerouting pipes through floor joists, adding $500-$2000 to renovation budgets.
Floor slope toward drains prevents standing water that creates safety hazards and maintenance headaches. Flat floors allow water pooling that damages materials and encourages mildew growth. Proper slope requires skilled installation during floor substrate preparation.
Ignoring Ventilation
Inadequate ventilation creates moisture problems that damage materials and promote mold growth. Building codes require mechanical ventilation in windowless bathrooms, typically achieved through exhaust fans. The fan must move adequate air volume measured in cubic feet per minute (CFM).
Calculate required CFM by multiplying bathroom square footage by 1.1 for spaces with 8-foot ceilings. A 50-square-foot bathroom needs approximately 55 CFM. Higher ceilings or larger spaces require proportionally greater capacity.
Fan location influences effectiveness. Position exhaust fans near showers or tubs where moisture concentrates. Drawing humid air away from moisture sources before it disperses throughout the room proves most effective. Avoid installing fans directly over toilets where they serve no moisture control purpose.
Critical Planning Reminders
- Verify all fixture clearances meet code minimums before finalizing layout
- Test door swing paths with cardboard templates during planning phase
- Confirm water heater capacity supports tub size requirements
- Plan electrical outlets and switches early in design process
- Budget 10-20% contingency for unexpected issues during renovation
- Obtain necessary permits before starting any plumbing or electrical work
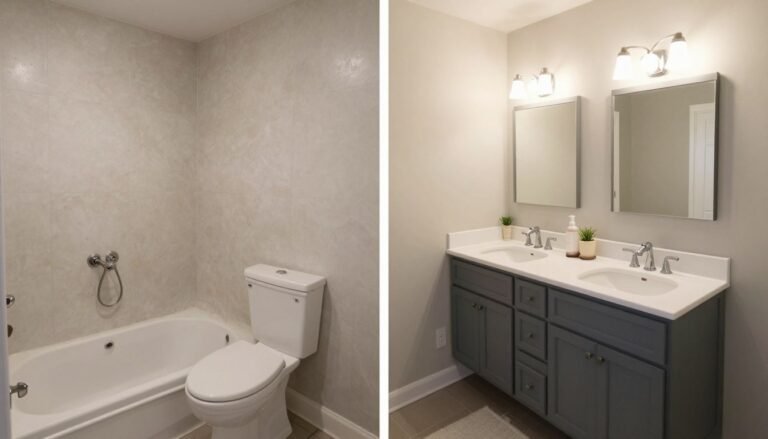
Cost Considerations for Small Bathroom With Tub Remodels
Understanding renovation costs helps establish realistic budgets and prevents mid-project financial surprises. Small bathroom remodels typically cost less than larger spaces due to reduced material quantities. However, the cost per square foot often runs higher because fixed expenses like plumbing fixtures don’t scale proportionally with room size.

Average Remodel Cost Ranges
Small bathroom renovations typically range from $6,000 to $25,000 depending on finish quality and scope. Basic updates replacing fixtures and finishes with budget materials start around $6,000-$10,000. Mid-range renovations using quality products but standard layouts cost $10,000-$18,000. High-end remodels with premium materials and complex layouts reach $18,000-$25,000 or more.
The wide cost variation reflects material choices and labor intensity. A basic alcove tub installation costs far less than a custom wet room with floor-to-ceiling tile. Prefabricated shower surrounds cost 60-75% less than fully tiled enclosures. These decisions compound throughout projects, creating substantial budget differences.
| Remodel Level | Cost Range | Typical Scope | Material Quality |
| Basic Refresh | $6,000 – $10,000 | Fixture replacement, new paint, basic tile | Budget-friendly materials, standard fixtures |
| Mid-Range Update | $10,000 – $18,000 | Complete renovation, quality finishes, minor layout changes | Name-brand fixtures, porcelain tile, semi-custom vanity |
| High-End Remodel | $18,000 – $25,000+ | Luxury materials, significant layout modifications, custom elements | Premium fixtures, natural stone, custom millwork |
Tub Replacement Costs
Replacing an existing tub with a similar alcove model typically costs $1,500-$4,000 including labor. The tub itself ranges from $300-$1,500 depending on material and features. Cast iron costs more than acrylic but lasts significantly longer. Installation labor adds $800-$2,000 depending on regional rates and project complexity.
Freestanding tub installations run higher due to exposed plumbing requirements. The visible supply lines and drain assemblies require premium fixtures costing $300-$800 beyond standard connections. Floor reinforcement sometimes becomes necessary to support concentrated weight loads. These factors push freestanding installations to $2,500-$6,000 total.
Plumbing Relocation Impact
Moving plumbing fixtures dramatically increases renovation costs. Relocating a toilet, sink, or tub requires new drain lines and supply pipes. Concrete slab foundations complicate drain relocation, sometimes requiring jackhammering and pipe rerouting. These modifications add $1,500-$5,000 to project budgets.
Keeping fixtures in existing locations whenever possible controls costs effectively. Plan layouts around current plumbing rough-in positions before considering relocations. The money saved on plumbing work can upgrade fixture quality or finishes significantly.
Second-floor bathrooms require special consideration for drain venting. Moving fixtures away from existing vent stacks necessitates new vent pipes routed through walls or ceilings. This work requires opening walls, adding substantial labor and drywall repair expenses.
DIY vs Contractor Decisions
Skilled homeowners can tackle cosmetic updates like painting, fixture replacement, and tile work. These DIY efforts potentially save 30-50% on labor costs. However, realistic skill assessment prevents expensive mistakes requiring professional correction.
Plumbing and electrical work typically require licensed professionals for code compliance and warranty coverage. Many jurisdictions mandate licensed contractors for these trades. The permit process often necessitates professional involvement regardless of homeowner capabilities.
Hybrid approaches balance DIY savings with professional expertise. Homeowners might handle demolition, painting, and fixture installation while contracting plumbing and electrical work. This division leverages personal skills while ensuring code-compliant critical systems.
Cost-Saving Strategies
- Keep fixtures in existing locations to avoid plumbing relocation expenses
- Choose prefabricated shower surrounds over custom tile when budget is tight
- Select mid-range fixtures that balance quality and affordability
- Complete demolition work yourself to reduce labor costs
- Purchase discontinued floor models or previous-year fixtures for significant discounts
- Plan renovations during contractor off-seasons for better rates
- Buy materials yourself rather than through contractor markups
- Focus budget on permanent fixtures over easily changed decorative elements
Small Bathroom With Tub vs Walk-In Shower — Which Is Better?
The tub versus shower debate dominates small bathroom planning discussions. Both options offer distinct advantages depending on household needs and priorities. The decision requires evaluating multiple factors beyond simple space calculations.

Resale Value Considerations
Home value impact varies by property type and target market. Single-family homes in family-oriented neighborhoods benefit from at least one tub somewhere in the house. Complete tub removal from a home’s only full bathroom typically reduces buyer appeal and potentially resale value.
Real estate agents consistently report buyer preferences for homes with tub options. Young families view bathtubs as essential for bathing small children safely. Pet owners appreciate tubs for washing dogs. These practical needs influence purchase decisions significantly.
Urban condos and homes targeting retirees face different market dynamics. These buyers often prefer accessible walk-in showers over tub-shower combinations. The decision should reflect the property’s likely buyer demographics and local market preferences.
When Tubs Add Value
- Family neighborhoods
- Homes with only one full bathroom
- Properties marketed to families
- Suburban single-family homes
- Areas with traditional buyer expectations
When Showers Make Sense
- Urban condos and apartments
- Properties marketed to seniors
- Homes with multiple full bathrooms
- Modern contemporary designs
- Accessibility-focused renovations
Family Needs Assessment
Current and anticipated household composition should drive this decision. Families with young children require tub functionality for safe bathing. The five to ten-year period of child-rearing demands practical bathing solutions that showers don’t provide.
Empty nesters and single occupants rarely use tubs for bathing. These demographics typically shower daily while using tubs infrequently if ever. Converting unused tubs to spacious showers often improves daily experiences significantly.

Pet ownership introduces another variable. Large dogs require washing facilities that showers can’t accommodate effectively. The tub provides contained spaces for messy cleaning activities. Households with multiple pets benefit substantially from tub retention.
Space Efficiency Comparison
Walk-in showers can feel more spacious than tub-shower combinations in identical footprints. The open design without tub walls or surrounding decks creates psychological openness. Frameless glass enclosures enhance this effect by minimizing visual barriers.
However, showers don’t necessarily save actual floor space. A 36×36-inch shower requires similar area to a 60-inch alcove tub. The tub might even use space more efficiently by fitting against three walls instead of requiring clearance for shower entry.
Wet room designs maximize space efficiency by eliminating separate shower enclosures entirely. These open layouts work particularly well in very small bathrooms where traditional shower enclosures create claustrophobic feelings. The seamless approach suits modern aesthetics while solving practical space limitations.
Budget Differences
Standard alcove tubs cost less to install than equivalent-sized walk-in showers. Basic acrylic tubs start around $300 while shower bases begin at $400-$500. The price difference compounds with surround materials. Prefabricated tub surrounds cost $200-$600 compared to $800-$2,000 for tile shower installations.
Custom showers with frameless glass, tile work, and premium fixtures easily cost double comparable tub installations. The glass enclosure alone adds $800-$2,000 versus $50-$150 for shower curtains. These cost differences matter significantly in budget-conscious renovations.
Bathtub Advantages
- Essential for bathing young children
- Maintains resale value in family markets
- Lower installation costs than custom showers
- Useful for washing pets
- Provides soaking relaxation option
- Traditional buyer expectations
Walk-In Shower Advantages
- Better accessibility for elderly or disabled
- Easier daily use for most adults
- Modern, updated appearance
- Potential space-saving in some layouts
- Less cleaning and maintenance
- Preferred by many contemporary buyers
FAQs About Small Bathrooms With Tubs
Can you put a tub in a 5×8 bathroom?
Yes, a standard 60-inch alcove tub fits comfortably in a 5×8-foot bathroom measuring 40 square feet. This represents one of the most common small bathroom dimensions. The 5-foot width accommodates the 60-inch tub along one wall, while the 8-foot length provides adequate space for a toilet and vanity on adjacent or opposite walls.
The layout typically positions the tub along the 5-foot wall, maximizing the 8-foot dimension for other fixtures. This arrangement maintains required clearances of 21 inches in front of the toilet and 24 inches in front of the tub. A 30-inch vanity fits opposite the tub, leaving a central aisle of approximately 30 inches for movement.
Door placement becomes critical in this size bathroom. The door must swing inward without hitting fixtures. A 24-inch door often works better than standard 30-inch doors in very tight layouts. Pocket doors eliminate swing radius requirements entirely when wall construction permits.
What is the smallest tub size available?
The smallest standard alcove tubs measure 48 inches long, though 54-inch models are more common and provide better bathing comfort. Japanese soaking tubs utilize vertical space with 48-inch lengths but deeper basins that accommodate sitting rather than reclining. Some specialty manufacturers offer 42-inch tubs, but these extremely compact options sacrifice bathing comfort significantly.
Width typically ranges from 28 to 32 inches regardless of length. Narrower tubs feel confining and limit movement during bathing. The standard 30-inch width provides adequate room without consuming excessive floor space. Depth varies from 14 to 28 inches, with soaking tubs at the deeper end of this range.
Freestanding tubs offer compact options starting around 54-55 inches. These shorter models work in tight spaces but require clearance around all sides for aesthetic appeal and cleaning access. The perimeter clearance often negates space savings compared to alcove installations.
Is a tub-shower combo outdated?
Tub-shower combinations remain practical and relevant in small bathrooms despite evolving design trends. While separate tub and shower configurations represent luxury, most small bathrooms lack space for this division. The combined function addresses practical needs efficiently without demanding separate footprints for each bathing option.
The perceived datedness often stems from execution rather than concept. Old-fashioned curtains, bulky framed doors, and small white tiles create dated appearances. Modern tub-shower combos with frameless glass, large-format tile, and contemporary fixtures look current and sophisticated.
Design choices dramatically impact whether these installations feel fresh or tired. Choosing quality materials and clean lines produces timeless results. The functionality remains valuable regardless of shifting style preferences. Family bathrooms particularly benefit from tub-shower flexibility that serves multiple user needs.
Does removing a tub hurt resale value?
The resale impact depends on the home’s overall bathroom count and target market demographics. Removing the only tub from a single-bathroom home typically reduces appeal to family buyers. Young parents view at least one tub as essential for safely bathing children. Homes marketed to families should maintain tub functionality somewhere in the floor plan.
Multi-bathroom homes can convert one tub to a walk-in shower without significant value impact if another tub remains accessible. The second bathroom’s tub addresses family bathing needs while allowing the master bath to prioritize shower functionality. This configuration satisfies both practical requirements and modern preferences.
Urban condos and properties targeting retirees face different dynamics. These buyer segments often prefer accessible showers over tubs. Market research on local buyer preferences helps guide this decision. Real estate agents familiar with specific neighborhoods provide valuable insights about target buyer expectations.
Are Japanese soaking tubs practical?
Japanese soaking tubs provide excellent functionality in specific situations despite requiring behavioral adjustments. The deep, compact design suits small bathrooms where standard tubs won’t fit. Users sit upright rather than reclining, with water reaching shoulder height. This bathing style creates spa-like experiences in minimal footprints.
The deeper water volume requires adequate hot water heater capacity. Standard 40-gallon tank heaters may not provide sufficient hot water to fill 24-28 inch deep basins comfortably. Tankless water heaters or larger tank capacities solve this limitation. Consider water heating requirements during planning to prevent disappointing performance after installation.
Cultural bathing practices influence satisfaction with soaking tubs. The upright sitting position feels natural to some users while others find it uncomfortable compared to reclining in standard tubs. Test soaking at a spa or showroom before committing to this configuration. The space savings justify minor comfort compromises in extremely small bathrooms, but user preferences should ultimately guide the decision.
Creating Your Ideal Small Bathroom With Tub Layout
Successfully fitting a bathtub into a small bathroom requires thoughtful planning and strategic fixture selection. The process starts with accurate measurements and understanding minimum clearances required by building codes. Every inch matters in compact spaces, making precise layout planning essential before purchasing materials or beginning construction.
The five layout configurations presented each solve specific challenges while maintaining bathing functionality. Classic alcove installations work for rectangular rooms with traditional aesthetics. Tub-shower combinations maximize utility in single-fixture spaces. Corner placements suit square floor plans. Wet room designs create spa atmospheres. Japanese soaking tubs provide luxury in minimal footprints.

Visual expansion techniques make physical constraints feel less confining. Large-format tiles, vertical layouts, and continuous materials create psychological spaciousness. Floating vanities and wall-mounted toilets expose floor surfaces that ground-level fixtures conceal. Strategic lighting eliminates shadows and dark corners that compress spaces visually.
Product selection influences both immediate costs and long-term satisfaction. Quality fixtures from established manufacturers like Kohler, Delta, Moen, and Grohe provide reliability that justifies higher upfront investments. Material choices in tile, countertops, and finishes should balance aesthetic preferences with practical maintenance requirements.
Budget management prevents mid-project financial stress. Understanding cost drivers like plumbing relocation and custom tile work helps establish realistic expectations. Strategic compromises on less visible elements preserve funds for focal point features that define the bathroom experience.
The tub versus shower decision deserves careful consideration of household needs and resale implications. Family bathrooms typically require tub functionality while master suites for adult-only households might prioritize spacious showers. Local real estate market preferences should inform this choice when resale value matters.
Successful small bathroom renovations combine practical function with aesthetic appeal. The result feels comfortable, looks attractive, and serves daily needs efficiently despite limited square footage. Careful planning transforms challenging spaces into bathrooms that homeowners enjoy using rather than merely tolerate.
Related Small Bathroom & Remodel Guides
Expand your bathroom design knowledge with these comprehensive guides covering related topics:

Tiny Bathroom Remodel Ideas
Discover innovative solutions for bathrooms under 40 square feet. Learn how to maximize every inch through clever storage, fixture selection, and visual tricks that create functional spaces from challenging dimensions.

Small Bathroom Layout Ideas
Explore proven layout configurations that optimize small bathroom functionality. Compare different fixture arrangements, traffic flow patterns, and space-planning strategies for various room dimensions.

Budget Bathroom Remodel Tips
Learn cost-saving strategies that deliver beautiful results without overspending. Understand where to splurge and where to save, plus DIY opportunities that reduce labor expenses significantly.

Best Tile for Small Bathrooms
Master tile selection for small spaces. Discover which sizes, colors, patterns, and materials create optimal visual effects. Learn installation patterns that enhance perceived spaciousness.

[…] Maximize a small bedroom with a twin-over-twin bunk bed that includes spacious under-bed storage drawers. Clean white framing keeps the room bright and visually open. Add labeled bins to create an easy system kids can actually maintain. The result is functional, tidy, and effortlessly charming. […]