
This post may contain affiliate links. Please see my disclosure policy for details.
How I Transform My Dining Room Chandelier Into a Christmas Showstopper (And Why You’re Probably Overthinking It)
Contents
- How I Transform My Dining Room Chandelier Into a Christmas Showstopper (And Why You’re Probably Overthinking It)
- Why Your Chandelier Is Begging for Christmas Decor (And You’re Just Ignoring It)
- What You Actually Need (Not the Entire Craft Store)
- The Color Situation (Or: How to Not Make It Look Like Christmas Threw Up)
- The Actual Process (Without the Fluff)
- The Safety Stuff I Learned the Expensive Way
- Timing This Whole Thing
- Budget Real Talk
Christmas chandelier decor saved my holiday sanity last year, and I’m never going back to bare light fixtures during the most wonderful time of the year.
Look, I get it. You’re scrolling through Pinterest at 11 PM, wondering if you need a degree in interior design to make your chandelier look like something out of a holiday magazine. You’re worried about damaging that fixture you saved up for. You’re pretty sure you’ll need a second mortgage to buy all that garland.
Let me stop you right there.
Why Your Chandelier Is Begging for Christmas Decor (And You’re Just Ignoring It)
Your chandelier hangs right there in the middle of your dining room or entryway, completely naked, while you’re fussing over garland on the mantel that half your guests won’t even see.
It’s the first thing people notice when they walk into your dining room. It literally has built-in lighting to make everything sparkle. And you’re just… leaving it there like it’s February.
I spent three Christmases ignoring mine until my sister-in-law showed up with her chandelier looking like a winter forest had moved indoors. I was done pretending I was “keeping it minimal.”
")
What You Actually Need (Not the Entire Craft Store)
Here’s what I wish someone had told me before I spent $200 on stuff I never used:
The absolute essentials:
- Faux evergreen garland (one 6-foot strand will do most chandeliers)
- Floral wire or zip ties in green or brown (seriously, don’t skip these)
- Wide ribbon in your color scheme (2-3 inches works best)
- A handful of shatterproof ornaments
- A sturdy ladder (not your wobbly dining chair, please)
If you want to level up:
- Bell garland for that magical sound when the door opens
- Berry picks or pinecones
- Extra ribbon for big statement bows
- Battery-operated taper candles if your chandelier style allows it
I spent $65 my first year and honestly, it looked better than my friend’s $300 version because I kept it simple.
The Color Situation (Or: How to Not Make It Look Like Christmas Threw Up)
Your chandelier finish is already telling you what colors to use, and you’re just not listening.
Got a brass or gold chandelier? Stick with warm metallics, deep greens, and either classic red or go bold with burgundy and cream.
Chrome or silver fixture? You’re in champagne, icy blue, and winter white territory.
Black or bronze? Lucky you—everything works, but jewel tones with gold accents look incredible.
I learned this the hard way when I tried forcing silver ornaments on my warm brass fixture. It looked confused, like it couldn’t decide if it was Christmas or New Year’s Eve.
")
Pick 2-3 colors plus one metallic and stop there. More isn’t merrier—it’s migraine-inducing.
The Actual Process (Without the Fluff)
Step 1: Turn off the chandelier and let it cool
I know this seems obvious, but I’ve burned my fingers twice because I was “just quickly adding one more thing.”
Step 2: Get your ladder situation sorted
Position it so you can reach every arm without doing acrobatics. I have my husband spot me because I’m clumsy and our homeowner’s insurance deductible is high.
Step 3: Attach your base garland layer
Start at one arm and work your way around using floral wire or zip ties. Wrap the garland over the top of the arms, not hanging below (yet). This creates your foundation.
The trick nobody tells you: fluff as you go. Don’t wait until the end to realize half your greenery is smashed flat against the metal.
Step 4: Add movement with draping
Now let some greenery hang below the arms. This is where it starts looking expensive instead of like you hot-glued some branches to a light fixture.
I space out small swoops of garland that dip about 4-6 inches below each arm. Nothing crazy—you’re not decorating a ballroom.
Step 5: Layer in the good stuff
This is where your personality shows up.
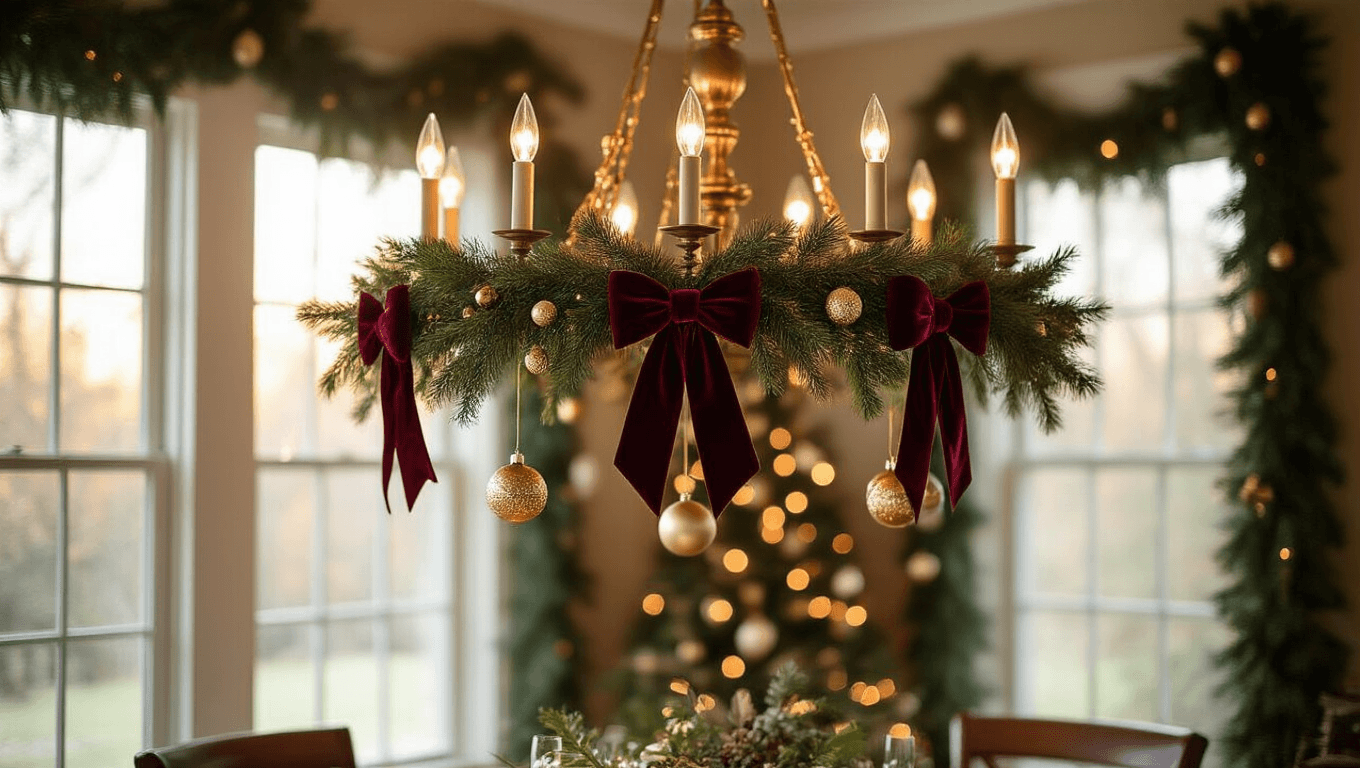
I tie big velvet bows at every other arm connection. Then I add bell garland draped in gentle curves between the arms. Finally, I hang 3-5 ornaments at different lengths from the center.
The key: odd numbers and varied heights. Three bows look intentional. Four looks like you ran out of ideas halfway through.
")
Step 6: Step back and squint
Seriously, climb down and look from every angle. Spin in a circle. Does one side look heavy? Is there a weird bald spot?
I fix these issues by tucking in extra greenery bits or moving an ornament.
Step 7: Turn on those lights
This is the moment you’ll either feel like a decorating genius or realize you need to adjust. The chandelier lights show every gap and imbalance.
I always end up adding more greenery than I think I need because the lights expose the framework.
The Safety Stuff I Learned the Expensive Way
Don’t let anything touch the light bulbs. I scorched a beautiful ribbon my first year and our dining room smelled like burned polyester for a week.
Keep a 3-inch clearance minimum from any heat source.
Check your smoke detector battery while you’re up there with the ladder. (You’re welcome.)
Make sure nothing is so heavy that it’s pulling your chandelier off-center. If you can see a tilt, you’ve gone overboard.
Timing This Whole Thing
I tell everyone it’ll take 45 minutes. It actually takes me 90 minutes because I’m picky and I stop for coffee halfway through.
If you’re creating content for social media (and honestly, why wouldn’t you document something this pretty?), budget 2-4 hours total.
I shoot while I’m decorating:
- Before photo when it’s bare
- Process shots while I’m adding garland
- Detail shots of the bows and ornaments
- Final reveal with the lights on at dusk
That blue hour lighting makes everything look magical without any special equipment.
")
Budget Real Talk
Bargain version ($30-80):
- Dollar store garland (check for quality—some looks seriously cheap)
- Basic ribbon from the craft store with a 40% off coupon
- Shatterproof ornaments from Target’s dollar section
- Bells from wherever
This absolutely works. I did this version in my breakfast nook and it’s lovely.
Middle ground ($80-200):
- Better quality faux greenery that actually looks real
- Velvet or satin ribbon in your exact colors
- Mix of ornament finishes
- Real jingle bells with good tone
- Maybe some floral picks with berries
This is my main dining room chandelier tier. It looks polished without making me feel guilty about


