

This post may contain affiliate links. Please see my disclosure policy for details.
Christmas Kitchen Decor: How I Transform My Kitchen Into a Festive Wonderland Without Breaking the Bank
Contents
- Christmas Kitchen Decor: How I Transform My Kitchen Into a Festive Wonderland Without Breaking the Bank
- The 3-Zone Strategy That Actually Works
- Zone 1: Creating Your Kitchen’s Christmas Focal Points
- Zone 2: The Supporting Cast That Steals Hearts
- Zone 3: Functional Festive Elements That Work Double Duty
- My Biggest Christmas Kitchen Decorating Mistakes (So You Don’t Make Them)
Christmas kitchen decor doesn’t have to be complicated or expensive to make your heart skip a beat every time you walk into the room.
Trust me, I’ve been there – staring at my plain kitchen in November, wondering how on earth I’m going to make it look like something straight out of a holiday magazine.
You know that feeling when you scroll through Pinterest and see those gorgeous Christmas kitchens that look like Martha Stewart herself designed them?
I used to think those spaces required a massive budget and professional styling skills.
Boy, was I wrong.
Why Your Kitchen Deserves the Christmas Treatment
Look, your kitchen isn’t just where you cook dinner and gulp down morning coffee.
It’s the beating heart of your home during the holidays.
This is where you’ll be:
- Baking cookies with the kids (and making a glorious mess)
- Preparing Christmas dinner while family members “help” by sneaking tastes
- Hosting impromptu hot chocolate sessions when friends drop by
- Creating memories that’ll stick around long after the decorations come down
Your kitchen works overtime during the holidays, so why not dress it up for the occasion?
My No-Stress Approach to Christmas Kitchen Magic
I learned this the hard way after my first disastrous attempt at holiday decorating.
Picture this: me, surrounded by tangled garland, broken ornaments, and a husband asking if we’re hosting the North Pole.
That’s when I developed my foolproof system.
🎨 Steal This Look
- Paint Color: Sherwin-Williams Alabaster SW 7008
- Furniture: farmhouse-style open shelving with iron brackets, vintage butcher block kitchen island on casters
- Lighting: schoolhouse pendant lights in aged brass finish, 12-inch globe with ribbed glass
- Materials: raw pine garlands, galvanized metal accents, chunky knit textiles, mercury glass, distressed white shiplap
I learned this the hard way after tripping over a decorative reindeer while carrying a hot pie to the oven; now I keep my Christmas magic strictly above counter height where it can’t sabotage my sanity.
The 3-Zone Strategy That Actually Works
Zone 1: The Show-Stoppers
These are your focal points – the pieces that make people go “wow” when they walk in.
Zone 2: The Supporting Cast
Smaller touches that tie everything together without screaming for attention.
Zone 3: The Functional Festive
Holiday items you actually use while cooking and entertaining.
Zone 1: Creating Your Kitchen’s Christmas Focal Points
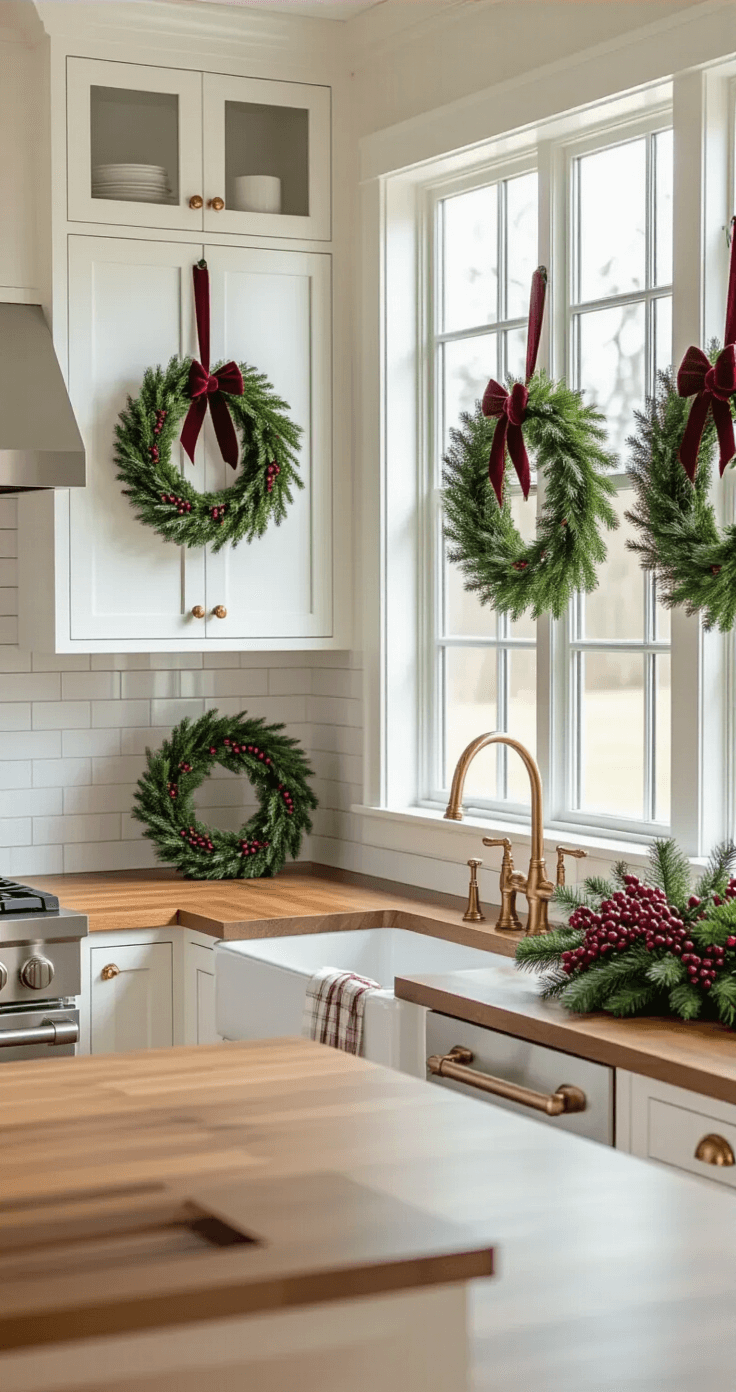
Cabinet Door Wreaths (Because Who Says Doors Are Just for Entering?)
I hang mini Christmas wreaths on my upper cabinet doors.
Here’s my secret: Skip the perfect, expensive wreaths.
Go for:
- Different sizes (creates visual interest)
- Simple ribbon ties (no complicated hanging hardware)
- Mixed textures (some with berries, some plain greenery)
Pro tip: Odd numbers work like magic. Three or five wreaths look intentional. Four or six? Meh.
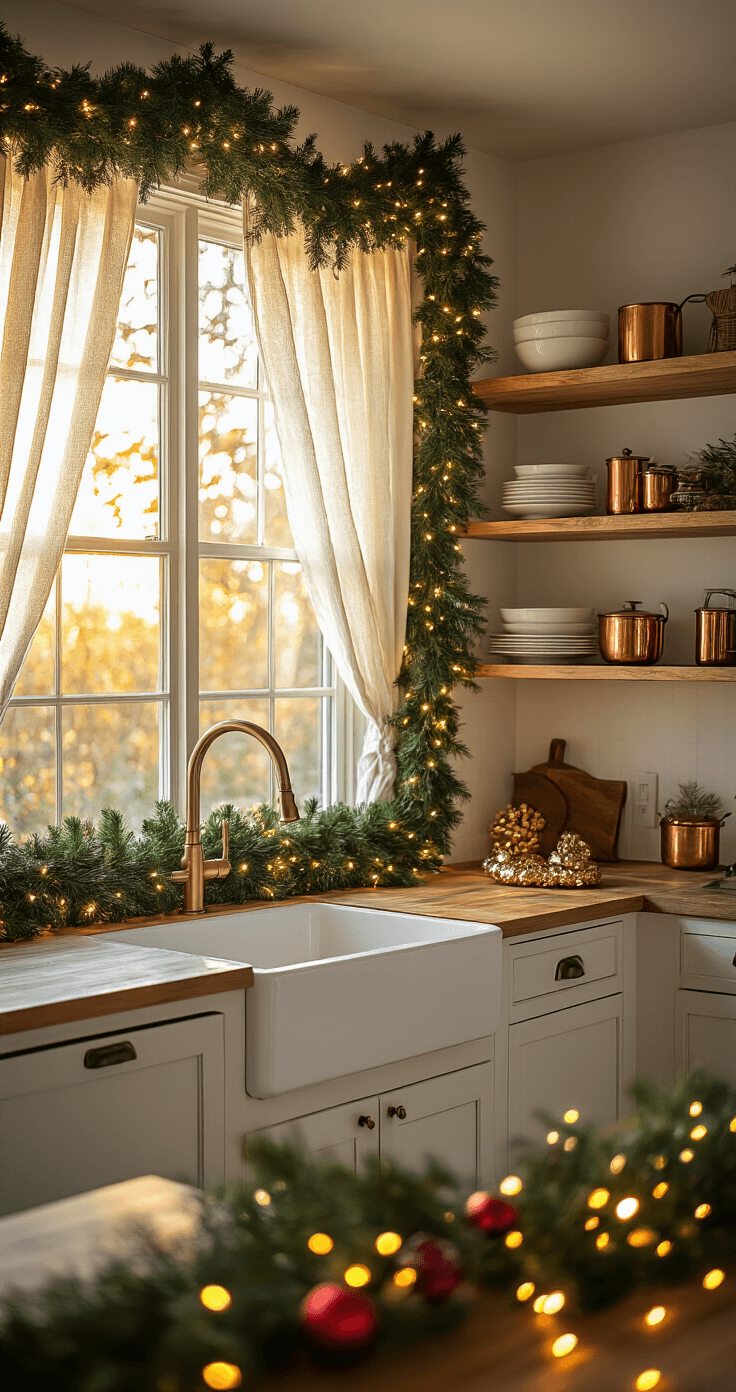
Garland That Doesn’t Look Like an Afterthought
I drape garland along:
- Open shelving edges
- Window frames above the sink
- The top of my kitchen island
My garland rules:
- Secure it properly (nothing kills the vibe like drooping greenery)
- Add battery-operated fairy lights for that cozy glow
- Mix in a few small ornaments for color pops
💡 Steal This Look
- Paint Color: Farrow & Ball Green Smoke 47
- Furniture: freestanding kitchen island with marble-look quartz top and turned legs
- Lighting: schoolhouse pendant lights in aged brass finish over the island
- Materials: dried orange slices, velvet ribbon in forest green, seeded eucalyptus, brushed brass cabinet hardware
This is where your kitchen starts to feel lived-in rather than decorated. I find myself reaching for mugs more slowly in the morning, just to linger in the glow of those tiny lights woven through garland above the sink.
Zone 2: The Supporting Cast That Steals Hearts
Dish Towel Magic (Yes, Really)
Swapping out regular dish towels for Christmas kitchen towels is like adding instant holiday spirit.
I look for:
- Buffalo plaid patterns
- “Merry and Bright” sayings
- Classic red and green combos
- Winter white with gold accents
Hang them on your oven handle, drape over bar stools, or display on open shelving.
The Power of Switching Out Everyday Items
This trick makes the biggest impact for the least effort.
I swap:
- Regular mugs for Christmas-themed ones
- Everyday canisters for holiday versions
- Plain cutting boards for festive wooden ones
- Standard placemats for holiday patterns
Budget hack: Hit up discount stores in early November. I’ve found gorgeous pieces for under $5 each.
🏠 Steal This Look
- Paint Color: Behr Polar Bear 75
- Furniture: open kitchen shelving with brass brackets, vintage-style bar stools with woven rush seats
- Lighting: schoolhouse pendant lights in aged brass finish over the island
- Materials: worn butcher block, matte ceramic canisters, woven cotton towels, antiqued brass hardware
This is the zone where I get genuinely excited for guests to open my kitchen door—these small swaps signal that the whole house is ready to welcome them without screaming ‘decorated for a photoshoot.’
Zone 3: Functional Festive Elements That Work Double Duty
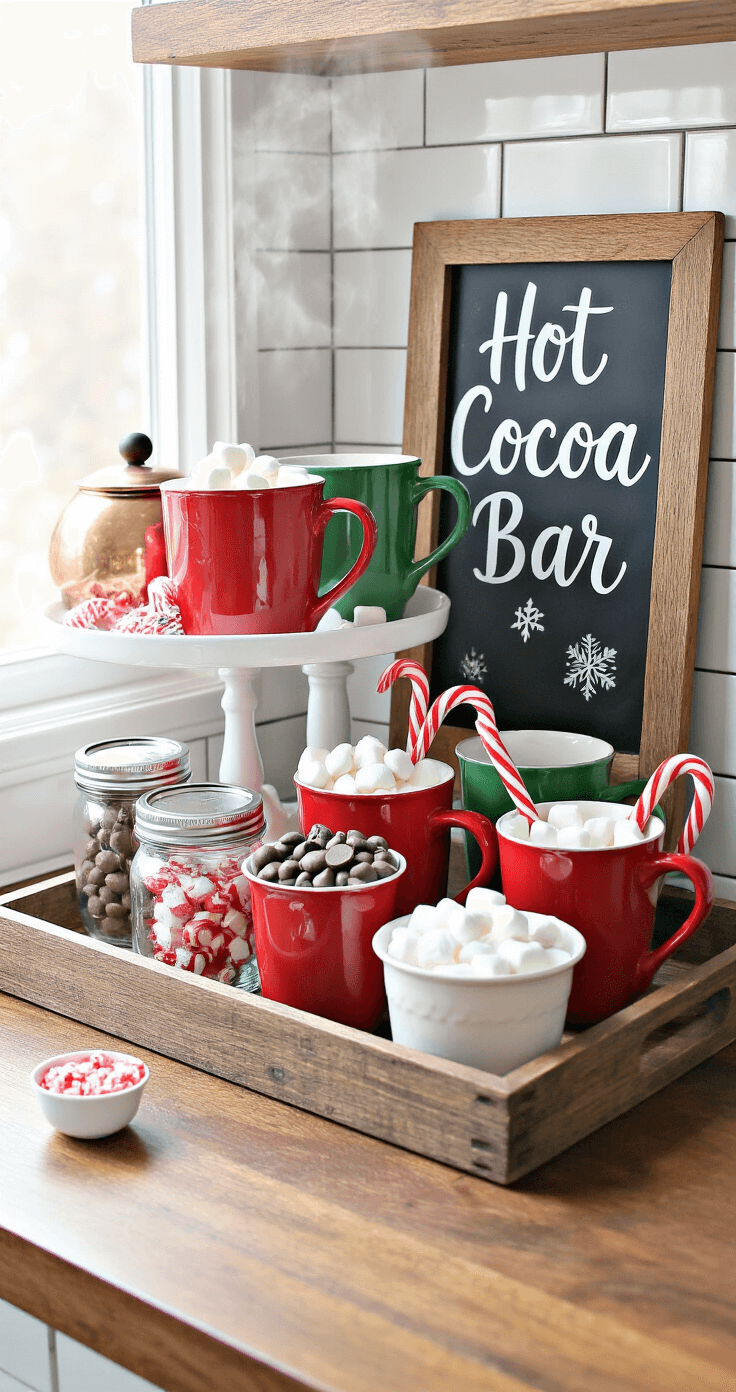
The Hot Chocolate Station That Everyone Raves About
I set up a dedicated hot cocoa corner using:
- A wooden tray as the base
- Mason jars filled with marshmallows, candy canes, and chocolate chips
- Festive mugs displayed on a small tiered stand
- A cute sign that says something like “Hot Cocoa Bar”
This isn’t just decoration – it’s functional entertainment.
Kids (and adults) love making their own perfect cup.
Centerpiece Vignettes That Don’t Get in the Way
I create small Christmas scenes on my counter using:
- A large wooden tray as the foundation
- Battery-operated candles (safety first with all that cooking happening)
- Mini bottle brush trees in various heights
- A few scattered ornaments
The key: Keep it low so it doesn’t block conversation across the kitchen island.

✎ Steal This Look
- Paint Color: Valspar Swiss Coffee 7002-16
- Furniture: wooden serving tray with handles, small 3-tier metal stand
- Lighting: battery-operated LED taper candles with warm white glow
- Materials: raw wood, clear glass mason jars, galvanized metal, matte ceramic
I learned the hard way that beautiful kitchen decor becomes clutter the moment you need to roll out cookie dough—now every piece I add has to earn its real estate.
My Biggest Christmas Kitchen Decorating Mistakes (So You Don’t Make Them)
Mistake #1: Going Overboard on Day One
I used to think more was better.
Wrong.
Start with a few key pieces and add gradually.
Your kitchen should feel festive, not like Santa’s workshop exploded.
Mistake #2: Ignoring Your Actual Lifestyle
That gorgeous gingerbread village looks amazing on Pinterest.
But if you’ve got toddlers who grab everything or you’re hosting daily homework sessions at the kitchen table, maybe skip the delicate decorations.


")


[…] true christmas wallpaper aesthetic isn’t just slapping some random Santa clip art on your screen and calling it […]
[…] wood aesthetics without breaking the bank? Stock cabinets […]