
This post may contain affiliate links. Please see my disclosure policy for details.
The Tree: The Foundation of Festive Glamour
Contents
- The Tree: The Foundation of Festive Glamour
- Lighting: The Sparkle That Sets the Tone
- Ribbons: The Secret to Luxe Layering
- Ornaments: The Stars of the Show
- Picks and Sprays: The Finishing Touches
- The Topper: Crown Your Creation
- The Base: Don’t Forget the Bottom
- Capturing the Magic: Photography Tips
- The Final Touch: Sit Back and Enjoy
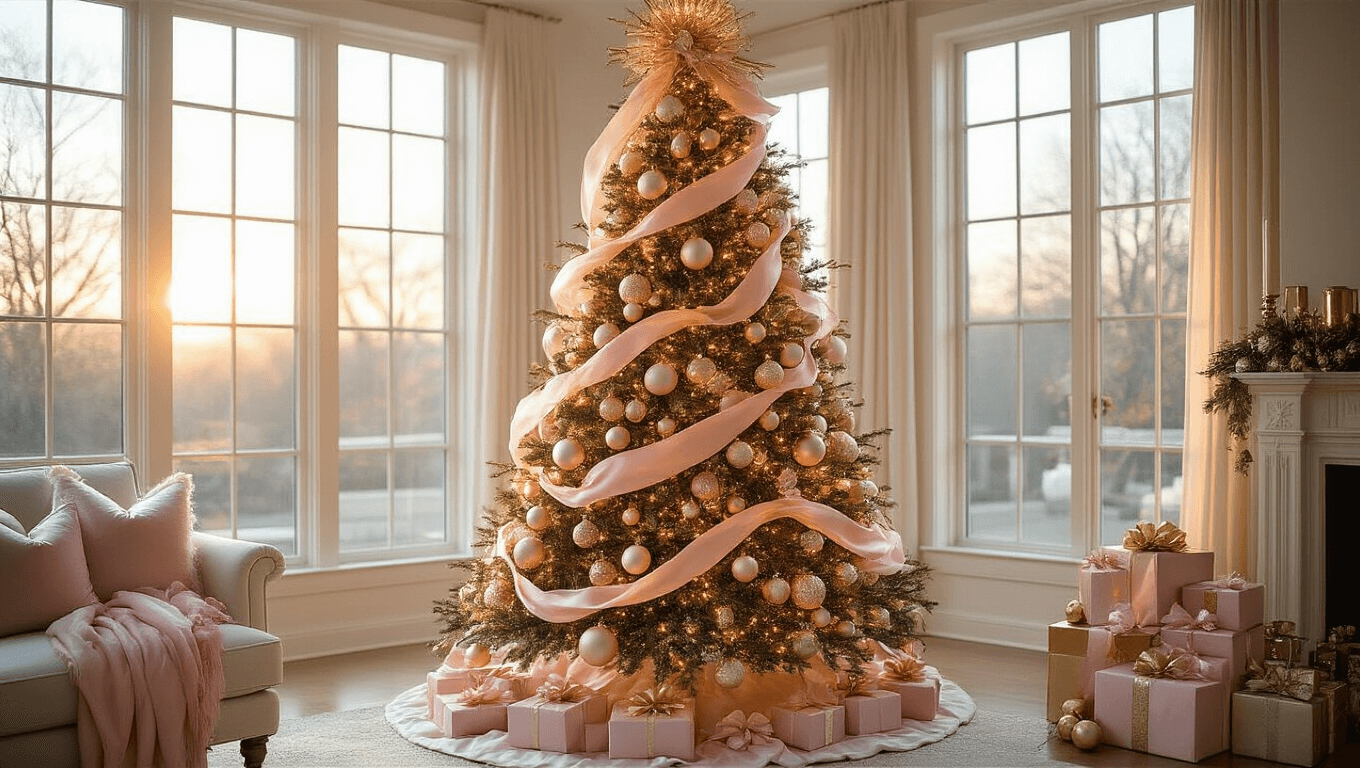
I’ve always been a sucker for a bit of sparkle during the holidays. This year, I decided to go all out with a pink and gold Christmas tree that’s turning heads and warming hearts. Let me walk you through how I created this festive masterpiece that’s equal parts romantic and opulent.
First things first: the prep work. I cleared out my living room, giving myself a good 3 hours to work my magic. Trust me, you’ll want the time and space to get this right.

I started with a 7.5-foot artificial tree. If you’re going au naturel, more power to you, but I wanted a blank canvas that would last the season.
Pro tip: Fluff those branches! It takes time, but it’s worth it for that full, lush look.
Lighting: The Sparkle That Sets the Tone
Next up, lights. I went for warm white LED string lights, weaving them deep into the branches for a glow that feels like it’s coming from within the tree itself.
Ribbons: The Secret to Luxe Layering
Here’s where the pink starts to shine. I chose a wide, blush pink satin ribbon and a narrower gold metallic one. Starting from the top, I wove them through the branches in loose, cascading waves.
Bold move: I made big, fluffy bows with the pink ribbon and nestled them into the tree at various points. It adds volume and breaks up the sea of branches beautifully.

Ornaments: The Stars of the Show
Now for the fun part – ornaments! I mixed and matched:
- Large, shimmery blush pink baubles
- Smaller gold ornaments in various finishes (matte, glossy, glittery)
- A few statement pieces like pink unicorns and gold angel wings
The key here is variety in size and texture. It keeps the eye moving and adds depth to your tree.
Clusters are your friend: Group similar ornaments together for impact. I placed three gold baubles close together, then a few inches away, a cluster of pink ones. It creates these gorgeous color blocks that really pop.

Picks and Sprays: The Finishing Touches
To fill any gaps and add some whimsy, I used:
- Gold leaf sprays
- Pink berry picks
- Glittery gold twigs
These little accents make the tree feel more organic and less “perfectly” decorated.
The Topper: Crown Your Creation
For my topper, I went big with a gold starburst. It’s a showstopper that ties the whole look together.
Budget-friendly alternative: A big bow made from your ribbon works just as well and costs next to nothing.

The Base: Don’t Forget the Bottom
I wrapped the tree stand in a plush, cream-colored faux fur skirt. It’s like a cozy cloud for all those presents to nestle into.
Styling hack: Tuck some oversized ornaments or wrapped “gifts” in coordinating paper around the base for extra oomph.

Capturing the Magic: Photography Tips
Once your tree is picture-perfect, it’s time to show it off! Here’s how I got those Insta-worthy shots:
- Natural light is your best friend. I shot during the day near a window.
- Get close-ups of your favorite ornament clusters.
- Step back for a full-tree shot that shows off the overall color scheme.
- Try different angles – eye level, looking up, even from above if you can manage it safely!
Edit with care: A little boost in warmth and sparkle goes a long way, but don’t go overboard. You want it to look magical, not fake.

The Final Touch: Sit Back and Enjoy
After all that hard work, pour yourself some cocoa, put on your favorite holiday tunes, and bask in the glow of your pink and gold masterpiece. You’ve earned it!
Remember, this is your tree. Maybe you want to throw in some icy blue accents or swap out the gold for silver. Make it yours! The joy is in the creating, and in sharing that festive spirit with everyone who sees it.
Now, if you’ll excuse me, I’ve got some presents to wrap in coordinating paper. ‘Tis the season for glamour, after all!
")


[…] your garlands and tree skirt with the red and gold […]
[…] here’s a pro tip: ribbon can totally transform your tree. Royal blue velvet? Classy. Navy satin? Sleek. Patterned blue? Fun! Layer them with some metallic […]