
This post may contain affiliate links. Please see my disclosure policy for details.
Winter fairy gardens transform the coldest months into an opportunity for magical creativity right in your home.
I’ve spent years experimenting with miniature gardens, and let me tell you—there’s something deeply satisfying about creating a tiny winter world when everything outside looks dead and dreary.
Your biggest worry is probably whether plants will even survive winter in these tiny setups. I get it. You’re wondering if this is just another Pinterest project that looks gorgeous in photos but dies within a week.
Let me walk you through exactly how I create winter fairy gardens that actually thrive.

What Makes Winter Fairy Gardens Different?
Contents
Unlike summer fairy gardens that sprawl across outdoor spaces, winter versions need strategic thinking.
You’re dealing with:
- Limited sunlight
- Cold-sensitive plants
- Indoor humidity challenges
- The need for seasonal charm without looking like a Christmas explosion
I learned this the hard way when my first winter fairy garden turned brown within two weeks.
Choosing Plants That Won’t Die on You
The Cold-Hardy Champions:
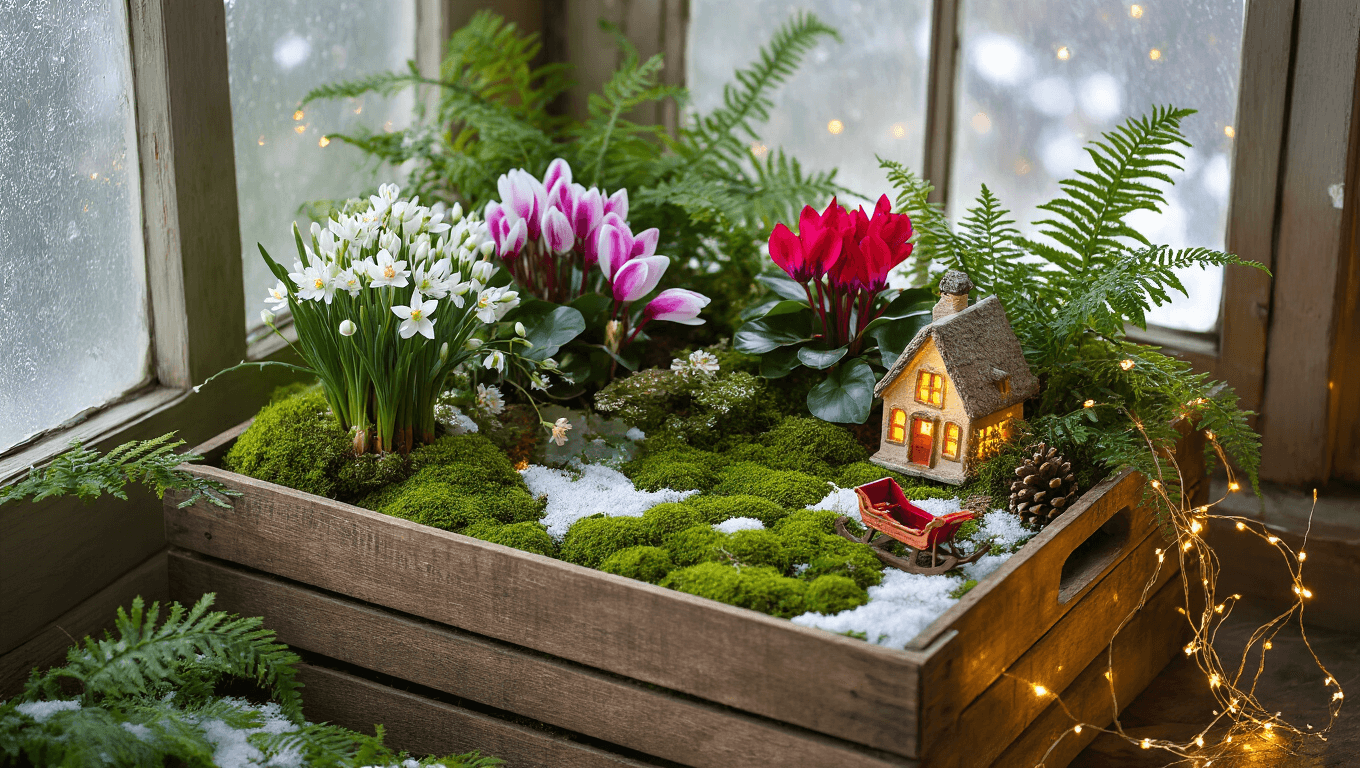
I always start with paperwhites as my anchor bloomers. They push through practically anything and give you actual flowers when everything else is dormant.
Cyclamen varieties work like magic—especially the XL Fuji Red type. These beauties bloom when most plants are hibernating, and they look proportionally perfect at miniature scale.
For ground coverage, nothing beats Creeping Thyme. It spreads without taking over, produces tiny purple flowers, and smells incredible when you brush against it.

The Textural Players:
- Scotch Moss: Creates that miniature grassy meadow effect
- Foxtail Ferns: Look exactly like tiny cypress trees (people always ask if they’re real miniatures)
- Dwarf Hostas: Colorful foliage at fairy-appropriate scale
- Small succulents: Sedums and sempervivums add architectural interest
I once used a miniature succulent collection that lasted through three seasons before I replanted them individually.
Pro tip: Visit your local nursery’s “clearance rack” in late fall. You’ll find perfectly healthy miniature plants at fraction of normal cost because nobody thinks about fairy gardens in November.
I killed my first three fairy gardens before I understood that winter-hardy doesn’t mean invincible in a shallow container—now I treat these miniature landscapes like the demanding little ecosystems they actually are, and the payoff of January blooms on my kitchen sill makes the vigilance worth every morning check.
The Container Situation
Forget expensive specialty planters.
I’ve created my best winter fairy gardens in:
- Thrifted wicker baskets (waterproofed with plastic liner)
- Vintage wooden crates
- Wide ceramic bowls from thrift stores
- Even an old dresser drawer
The only non-negotiable: drainage.
Without it, you’re creating a miniature swamp, not a fairy garden.
I drill holes if the container doesn’t have them, then add a layer of small pebbles before soil.
A shallow planter with drainage saves you the modification work and gives professional results.

There’s something deeply satisfying about rescuing a forgotten crate from a barn sale and transforming it into a tiny world—imperfection is part of the charm.
Building Your Winter Scene (The Part That Actually Matters)
Step 1: Create Your Base Layer
Start with quality potting mix—not garden soil. Garden soil compacts in containers and suffocates roots.
Leave the center area somewhat open. This is your staging area for all those adorable accessories.
Step 2: Position Plants Strategically
Taller plants go toward the back (obviously). But here’s what most people miss: arrange them in odd numbers.
Three plants look intentional. Four plants look like you couldn’t decide.
I place mine without permanently planting first. Use terracotta plates underneath to test positioning before committing.
Step 3: Layer in the Magic
This is where winter fairy gardens separate from regular miniature gardens.
Faux snow transforms everything. Don’t just sprinkle it—create drifts and piles like real snow accumulates.
Layer it over hardy plants like paperwhites. They’ll push through just like real plants do through snow.
Add miniature fairy garden accessories that tell a story:
- Tiny sleighs
- Evergreen trees (faux ones work perfectly)
- A fairy bundled in winter clothes
- Miniature woodland animals
- Small lanterns or cottages
I avoid overdoing Christmas-specific items unless it’s specifically a holiday display. Winter lasts way longer than Christmas season, and you don’t want to tear down your creation on December 26th.
Step 4: Add Living Texture
This is my secret weapon: moss.
Real preserved moss (not the faux craft store stuff) adds incredible texture and fills gaps naturally.
Press it gently into soil around plants and accessories. It looks intentionally placed but naturally occurring.

This is where your winter fairy garden stops being a craft project and becomes an actual tiny world you’ll find yourself checking on with your coffee every morning.
🛒 Get The Look
The Lighting Game-Changer
Here’s something I discovered by accident:
Battery-operated fairy lights with warm white bulbs make winter fairy gardens absolutely magical at dusk.
Thread them through your design, hiding the battery pack behind taller plants.
The first time I did this, my neighbor knocked on my door asking where I bought my “enchanted garden.”
She didn’t believe I made it.
Where to Actually Put This Thing
Outdoor Placement:
Protected porches work beautifully during moderate winter weather. Your plants get natural light without harsh wind exposure.
But watch temperatures.
Below freezing for extended periods sends most fairy garden plants into survival mode. They stop looking magical and start looking dead.


—Here's How You Can Too")
")
[…] moss – creates that perfect miniature lawn […]
[…] Creating a whimsical garden isn’t about perfection – it’s about creating a space that brings you joy. Every quirky statue, unexpected plant combination, and creative display tells a story. […]