
This post may contain affiliate links. Please see my disclosure policy for details.
Transform Your Tiny Front Porch Without Emptying Your Wallet
Contents
Budget-friendly front porch ideas don’t require a construction crew or a trust fund—just a free weekend and somewhere between $200-$500.
I get it. You walk up to your front porch every single day and cringe a little. Maybe the paint’s peeling, the light fixture looks like it survived the Reagan administration, or there’s literally nothing there except a sad doormat from 2015.
Your porch is the first thing guests see, and right now it’s giving “I’ve given up” vibes.
But here’s the thing: you don’t need thousands of dollars or a degree in interior design to fix it. I’ve transformed my own front porch three times in the last five years, and each time I’ve spent less than a decent dinner out would cost for a family of four.
Let me show you exactly how to do it.

★ Steal This Look
- Paint Color: Sherwin-Williams Tricorn Black SW 6258
- Furniture: two stackable resin Adirondack chairs with slim profiles
- Lighting: flush-mount LED exterior lantern with seeded glass
- Materials: weathered cedar-look composite decking, galvanized steel planters, braided polypropylene outdoor rug
My first porch was a 4×6 concrete slab I transformed for $187, and the neighbor who’d lived there fifteen years finally learned my name—porches are conversation starters, not just curb appeal.
Why Your Front Door Is Screaming for Attention
Paint your front door a color that actually makes you smile when you pull into the driveway.
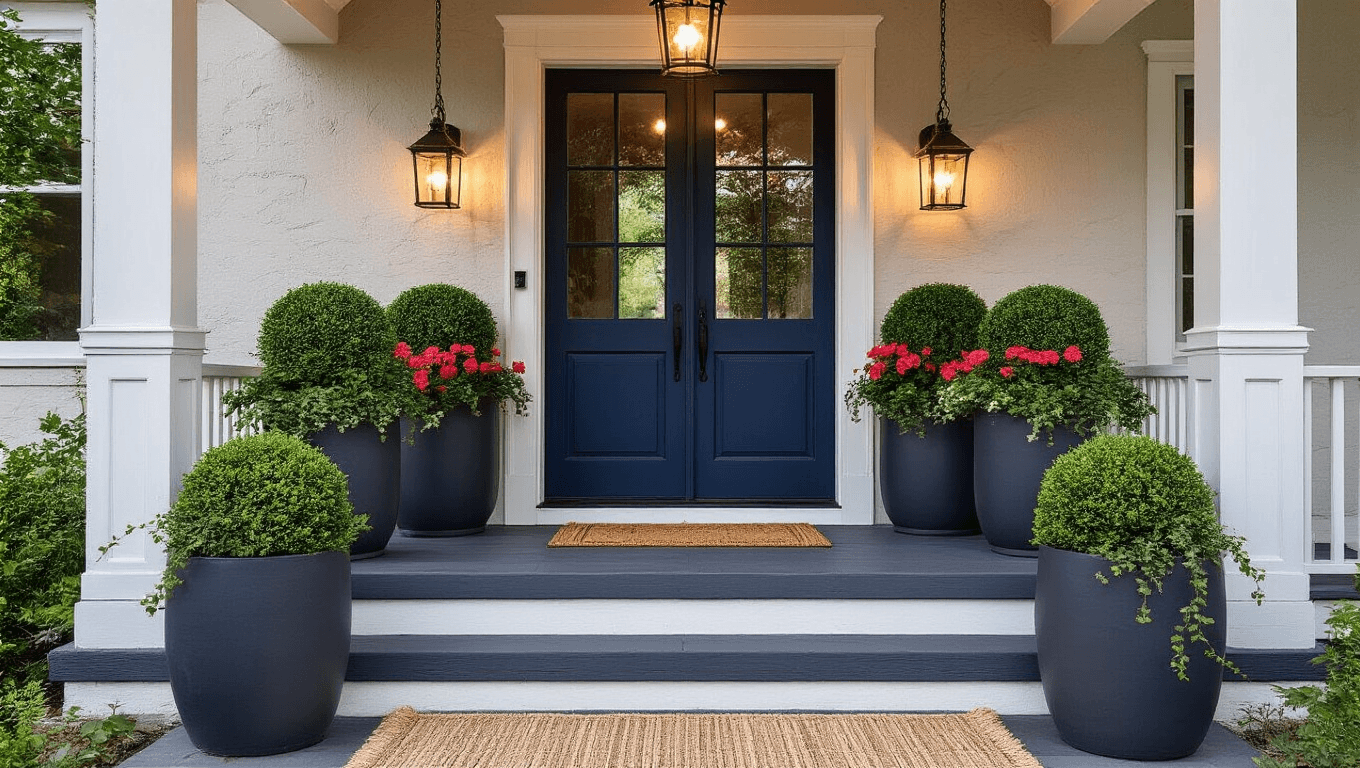
I painted mine a deep navy blue last spring, and I swear my neighbors thought I’d hired professionals. It took four hours, one can of exterior door paint, and zero experience.
The color matters more than you think. Your door should complement your home’s exterior, not match it exactly. Think contrast, not camouflage.
If your house is brick, go bold with a jewel tone. Light siding? Try a sophisticated charcoal or a cheerful coral. White house? Honestly, you’ve won the lottery because everything works.
Here’s what actually works:
- Deep navy or black for traditional homes
- Bright red for colonial or farmhouse styles
- Sage green for cottages or craftsman houses
- Sunny yellow for beach or coastal vibes
- Charcoal gray for modern exteriors
Before you even crack open the paint can, grab a new door hardware set.
I’m talking about handles, deadbolts, and maybe a door knocker if you’re feeling fancy. Shiny new hardware against fresh paint? Chef’s kiss.
The difference between builder-grade brass from 1997 and a sleek matte black handle is night and day. This upgrade alone makes people think you spent way more than you actually did.

✎ Steal This Look
- Paint Color: Benjamin Moore Hale Navy HC-154
- Furniture: a slim black metal console table tucked beside the door for packages and decor layering
- Lighting: a seeded glass and oil-rubbed bronze wall sconce flanking the door at eye level
- Materials: matte painted wood door, brushed nickel or black iron hardware, weather-resistant natural fiber doormat
I’ve watched too many homeowners play it safe with beige doors that disappear into the siding—your front door is the handshake of your house, and nobody remembers a limp handshake.
The Floor Situation Nobody Talks About
Your porch floor is probably concrete or wood, and there’s a good chance it looks rough.
I power washed mine before doing anything else, and the amount of grime that came off was frankly embarrassing. Rent a power washer for $50 or borrow your neighbor’s—it’s worth it.
Once it’s clean and dry, you’ve got options.
Paint those steps. Use porch and floor paint designed for foot traffic, not regular exterior paint that’ll chip off in three weeks.
Want to get creative? Grab some floor stencils and create a pattern. I’ve seen people do faux tile, geometric designs, even a simple border that looks custom.
Limewash is another option if you want that European farmhouse vibe. It’s more forgiving than paint and gives you texture that hides imperfections.
The key is prepping properly—clean surface, good weather, and patience between coats. Rush this part and you’ll be repainting next month.

✎ Steal This Look
- Paint Color: Farrow & Ball Off-Black No. 57
- Furniture: a pair of weathered teak Adirondack chairs with slatted seats
- Lighting: a galvanized steel barn light with gooseneck arm in matte black
- Materials: porcelain tile-look stenciled concrete, limewashed brick accents, sisal door mat layered over painted floor
There’s something deeply satisfying about transforming a grimy, forgotten concrete slab into a space that actually invites you to linger with coffee in hand.
🎁 Get The Look
Light It Up Without Calling an Electrician
Outdoor lighting can make or break the whole vibe.
I replaced my basic builder fixture with a modern pendant lantern, and it became the thing everyone comments on.
You don’t need to rewire anything. Most light fixtures use the same mounting bracket, so it’s literally just unscrewing the old one and screwing in the new one. Turn off the breaker, follow the instructions, and you’re done in 20 minutes.
If your budget’s really tight, don’t even replace the fixture. Just swap out those awful yellow bulbs for natural white ones. The difference is stunning, and it costs about $8.
Here’s a secret the pros use: layer your lighting.
Add string lights across the porch ceiling or wrap them around porch posts. Tuck small solar spotlights in your planters to uplight plants at night. Put a couple of battery-operated lanterns on the steps.
Suddenly your porch works after dark, which is when most people actually come home anyway.

🖼 Steal This Look
- Paint Color: Behr Cracked Pepper PPU18-01
- Furniture: compact bistro set with foldable metal chairs
- Lighting: modern pendant lantern with seeded glass and matte black finish
- Materials: weathered wood, wrought iron, frosted glass, solar-powered resin
I learned this the hard way on my own narrow stoop—one wrong fixture choice and you’re ducking every time you grab the mail, but get it right and suddenly your porch feels like an actual room.
The Plant Situation That Changes Everything
Large planters flanking your front door are non-negotiable.
I’m not talking about those dinky 10-inch pots. Go big or go home—literally.
Oversized planters make a small porch look intentional instead of cluttered. They frame your entrance and give you a place to add color and life without overwhelming the space.
What actually works in planters:
- Tall plants in the back (boxwoods, grasses, small topiaries)
- Medium flowering plants in the middle (hydrangeas, geraniums)
- Trailing plants at the edges (sweet potato vine, creeping jenny)
- Seasonal flowers up front (pansies, petunias, begonias)
Match your planters on both sides of the door. Symmetry makes everything look more expensive and professional.
I killed approximately 47 plants before I learned this: match the plant to your light conditions, not your aesthetic preferences.
Got full sun? Geraniums and petunias will thrive. Mostly shade? Hostas, ferns, and begonias are your friends. Ignore this advice and you’ll be replanting every six weeks like I was.
If you’re plant-challenged like I used to be, start with just greenery. Boxwoods in large planters look sophisticated year-round and require basically zero maintenance beyond occasional watering.

🌟 Steal This Look
- Paint Color: use Valspar brand. Match the ACTUAL wall color in the image. Format: Valspar Garden Gate 5006-1B
- Furniture: pair of 24-inch square tapered fiberglass planters in matte charcoal
- Lighting: solar-powered warm white uplights for planter bases
- Materials: fiberglass composite planters, boxwood topiaries, trailing sweet potato vine, weathered terracotta accents
I learned the hard way that one dead plant in a prominent planter undoes all your curb appeal work—now I keep a backup nursery pot hidden behind the garage for instant swaps when something fails.
The Rug Layering Trick That Interior Designers Love
An extra-wide welcome mat changes the entire feel of your porch.
But here’s what actually looks good: layer your rugs.
Put down a larger, neutral outdoor rug first, then add a smaller welcome mat on top. It defines the space, adds warmth, and looks way more expensive than
")


