
This post may contain affiliate links. Please see my disclosure policy for details.
What You’re Actually Worried About (And Why You Shouldn’t Be)
“Will this look cheap?”
“Do I really need to spend $200 on decorations I’ll use for three weeks?”
“What if I’m terrible at this whole decorating thing?”
Stop right there.
Your front porch doesn’t need to look like a Pinterest board threw up on it.
It needs to feel welcoming, seasonal, and like you actually live there.
")
Start With What You’ve Already Got
Before you click “add to cart” on anything, walk through your house.
Seriously.
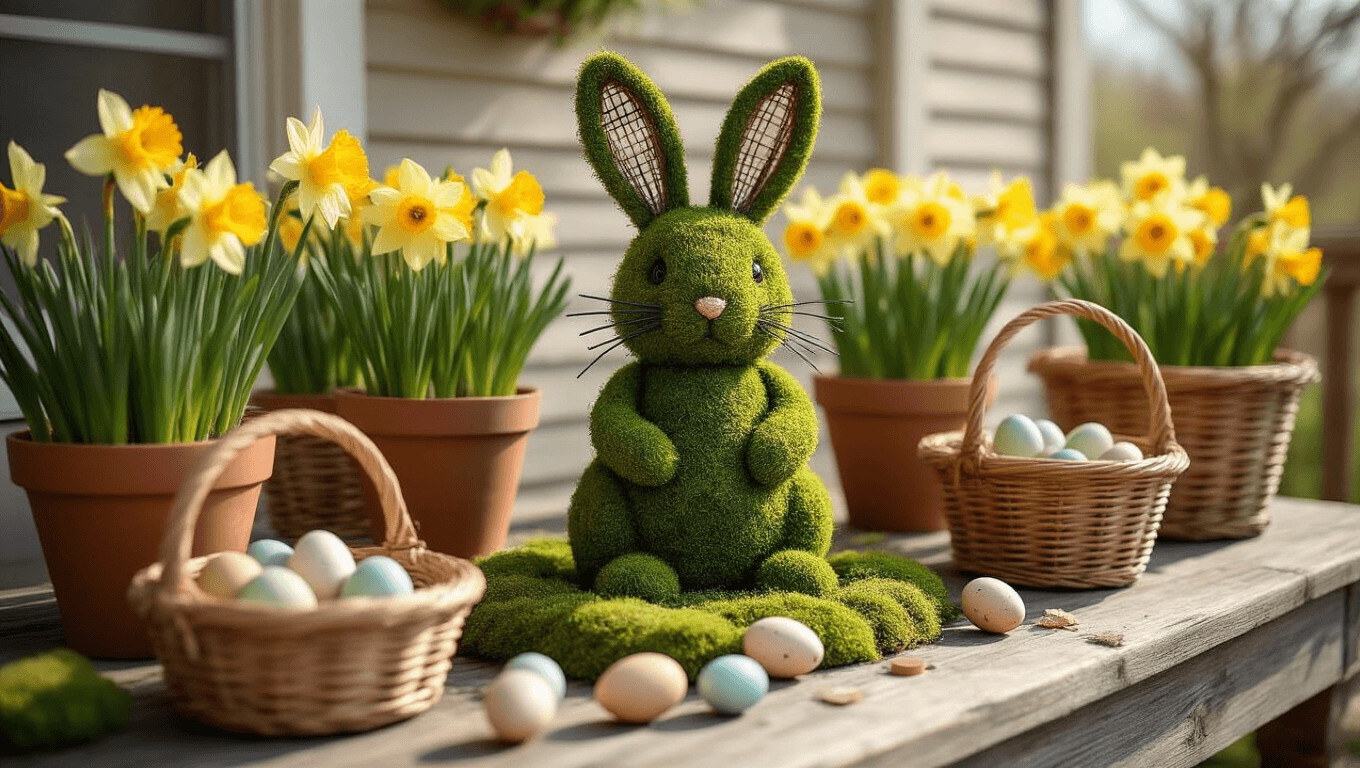
I found an old wicker basket in my garage that became my porch centerpiece last year.
Cost? Zero dollars.
Look for:
- Baskets (any size, any condition)
- Clay pots you’re not using
- Throw pillows that aren’t Easter-specific but have spring colors
- Vintage items like watering cans or milk jugs
- Fabric scraps for DIY projects
This inventory trick saved me about $75 last Easter alone.
The Three-Layer Formula That Actually Works
Forget complicated design rules.
Your porch needs three layers, and I’m breaking it down so simply my neighbor’s teenager could do it.
Layer 1: The Foundation (Ground Level)
Start with an outdoor rug if you have the budget.
It anchors everything.
If you don’t have one, skip it entirely—a bare porch is better than a cheap-looking mat.
Add these ground-level pieces:
- Large planters with fresh spring flowers (tulips, daffodils, hyacinths)
- Statement decorations like decorative concrete bunnies or oversized eggs
- Baskets filled with faux eggs and greenery
The key? Keep it to one or two statement pieces max.
More isn’t better—it’s just cluttered.
")
Layer 2: Eye Level (Where People Actually Look)
This is your front door and immediate surrounding area.
Your wreath goes here, obviously, but let me tell you what actually makes people stop and smile.
Door Focal Points:
- Easter wreaths with texture (mix faux greenery with natural elements)
- Oversized baskets hung directly on the door
- Palm branches tied with wide ribbon (sounds fancy, takes five minutes)
I hung a simple grapevine wreath last year, hot-glued some Dollar Tree eggs in a cluster on one side, and people raved about it.
Total cost? $12.
Flanking Elements:
Place matching items on either side of your door:
- Potted topiary plants
- Lanterns with LED candles
- Tall branches in weighted urns
Symmetry makes everything look more expensive than it is.
")
Layer 3: Extras (The Personality Layer)
This is where you add the fun stuff without going overboard.
Seating Areas:
If you’ve got a bench or chairs, toss on:
- Colorful outdoor pillows in spring colors (not necessarily pastel—jewel tones work beautifully)
- Light throw blankets for those chilly spring evenings
- Small side table with a simple floral arrangement
Hanging Elements:
- Egg garlands strung along railings
- Wind chimes (keep it subtle)
- Hanging baskets with trailing flowers
")
The DIY Projects Worth Your Time (And The Ones That Aren’t)
I’ve wasted hours on Pinterest fails.
Let me tell you what actually works.
Worth It: Dollar Store Moss Bunnies
Grab these from Dollar Tree:
- Two mixing bowls (different sizes)
- Sheet moss
- Hot glue gun
- Wire for ears
Stack the bowls, cover with moss, attach wire ears.
You’ve got a $17 statement bunny that looks like you paid $80.
I made three of these in one evening while watching a movie.
Worth It: Fabric Scrap Eggs
Cut egg shapes from plywood scraps.
Wrap them in fabric you already have (old curtains, leftover quilting material, whatever).
Staple on the back.
These work year after year, and you can change the fabric to match your evolving style.
Worth It: Simple Egg Wreaths
Buy a wire wreath form.
Hot glue plastic eggs in tight clusters until it’s covered.
That’s it.
Don’t overthink it.
Not Worth It: Elaborate Painted Egg Displays
They chip, fade, and take forever.
Unless you genuinely enjoy painting eggs for hours, skip this.
Not Worth It: Fresh Grass Centerpieces
They die in three days and look sad.
Use faux moss instead.
")


[…] Your neighbors might get decoration […]