
This post may contain affiliate links. Please see my disclosure policy for details.
Creating Your Perfect Concrete Fire Pit: A Complete Outdoor Styling Guide
Contents
- Creating Your Perfect Concrete Fire Pit: A Complete Outdoor Styling Guide
- Why a Concrete Fire Pit? The Ultimate Outdoor Game-Changer
- Essential Tools You’ll Need
- Design Considerations: Making It Uniquely Yours
- Step-by-Step Concrete Fire Pit Creation
- Safety First: Non-Negotiable Guidelines
- Styling Your New Fire Pit: Making Magic Happen
- Maintenance: Keeping Your Fire Pit Looking Fabulous
- Pro Photography Tips (Because Instagram Needs to See This!)
- Budget-Friendly Hacks
- Common Mistakes to Avoid
- Final Thoughts: Your Backyard Transformation Awaits
Every backyard dreams of that magical centerpiece that transforms ordinary outdoor spaces into extraordinary gathering spots. My concrete fire pit project is about to become your new weekend obsession.

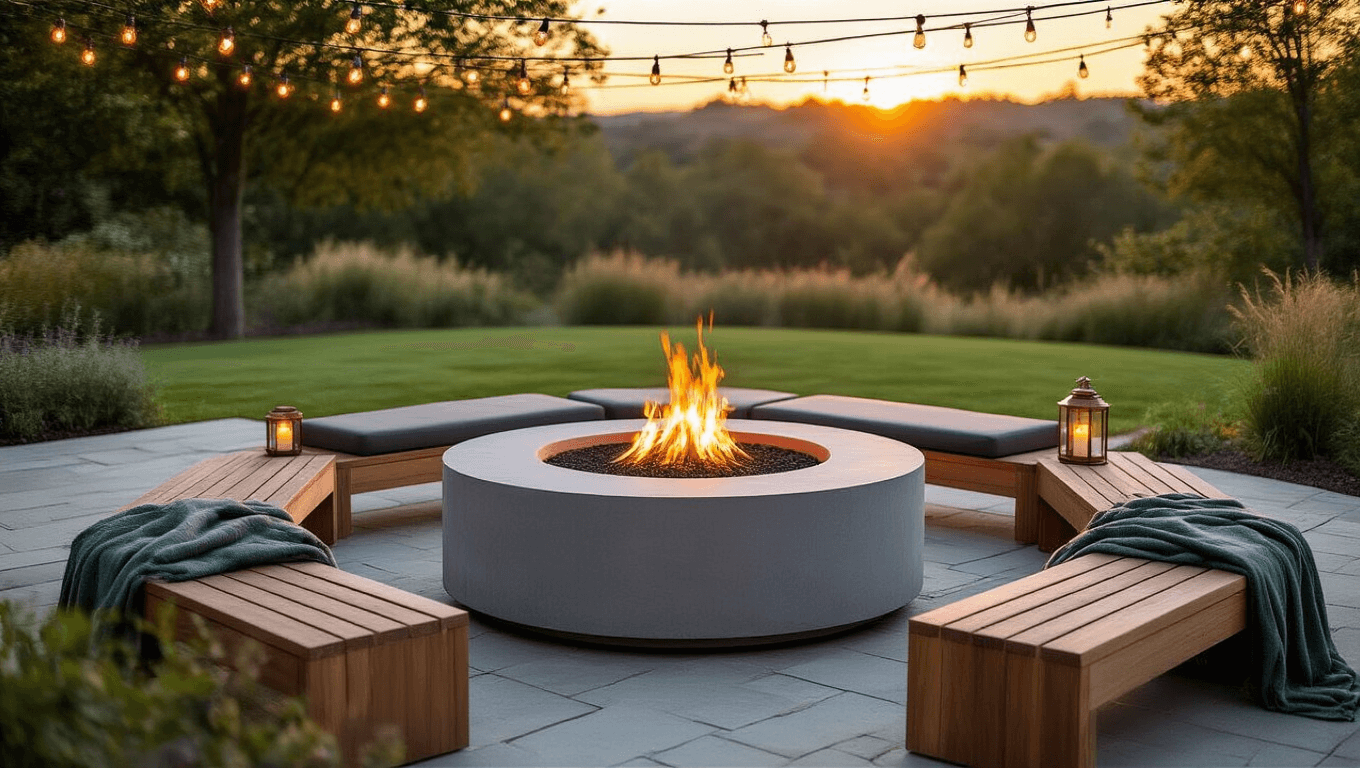
🏠 Steal This Look
- Paint Color: Sherwin-Williams Tricorn Black SW 6258
- Furniture: weathered teak Adirondack chairs with wide arms for drink resting, paired with a concrete drum side table
- Lighting: string lights with Edison bulbs suspended on black iron poles around the perimeter, plus solar-powered path lights leading to the pit
- Materials: raw board-formed concrete texture, blackened steel fire ring, crushed decomposed granite base, reclaimed cedar mantel shelf, chunky knit wool outdoor throws
There’s something primal about gathering around flame that no outdoor TV or speaker system can replicate—I’ve watched shy neighbors become fast friends over s’mores and the hypnotic crackle of burning cedar.
Why a Concrete Fire Pit? The Ultimate Outdoor Game-Changer
Let’s cut to the chase. A concrete fire pit isn’t just a decorative element – it’s an experience waiting to happen. Whether you’re a weekend warrior or a design enthusiast, this project checks all the boxes:
Quick Project Snapshot
- Total Time: 2-4 hours
- Difficulty: Moderate DIY challenge
- Budget: $50-$300
- Style Options: Modern, Rustic, Industrial
Essential Tools You’ll Need
Concrete Fire Pit Toolkit
- Heavy-duty mixing bucket
- Protective gloves
- Safety glasses
- Concrete mix
- Custom mold (PVC pipe or mixing bowl)
- Trowel
- Sealant
- Optional: Concrete pigments for custom color

🖼 Steal This Look
- Paint Color: Farrow & Ball Off-Black No. 57
- Furniture: weathered teak Adirondack chairs with wide armrests for drink resting
- Lighting: string lights with Edison bulbs suspended on galvanized steel guide wire between pergola posts
- Materials: raw concrete, blackened steel, untreated cedar, river rock drainage base
There’s something deeply satisfying about building the gathering point yourself rather than unboxing it—these tools become the start of a ritual, not just a project.
🔔 Get The Look
Design Considerations: Making It Uniquely Yours
Style Variations to Explore
- Minimalist Gray: Sleek, contemporary look
- Terra Cotta Warmth: Earthy, Mediterranean vibes
- Industrial Chic: Raw concrete with metal accents
Step-by-Step Concrete Fire Pit Creation
Preparation is Key
- Choose your location carefully
- Check local fire code regulations
- Create a stable, level base
- Design your mold
Mixing and Pouring Pro Tips
- Concrete Consistency: Think thick pancake batter
- Avoid Air Bubbles: Tap mold gently while pouring
- Curing Time: Minimum 48 hours before use

✎ Steal This Look
- Paint Color: Valspar Granite Dust 5003-3B
- Furniture: weathered teak Adirondack chairs with wide arms for drink resting
- Lighting: string lights with Edison bulbs suspended on galvanized steel guide wire
- Materials: board-formed concrete texture, blackened steel fire ring, crushed decomposed granite base, reclaimed barn wood seating surround
There’s something deeply satisfying about building the gathering place yourself—every crack and air pocket becomes part of the story your friends will trace with their fingers while the fire glows.
Safety First: Non-Negotiable Guidelines
Warning: Never skip these critical safety steps:
- Use protective gear
- Work in ventilated area
- Keep water nearby
- Follow manufacturer’s concrete instructions
Styling Your New Fire Pit: Making Magic Happen
Complementary Decor Elements
- Weathered wooden benches
- Cozy outdoor cushions
- Textured throw blankets
- Strategic lighting (string lights work wonders)

🎨 Steal This Look
- Paint Color: Dunn-Edwards Weathered Wood DET671
- Furniture: reclaimed teak bench with slatted backrest, low-profile concrete side table
- Lighting: Edison bulb string lights with black rubber cable, draped overhead on galvanized steel guide wire
- Materials: rough-hewn cedar, hand-thrown ceramic planters, unsealed concrete, chunky knit wool, oxidized metal
There’s something primal about gathering around fire that makes us want to get closer, to lean in—your styling should honor that instinct while keeping everyone comfortable through long, meandering conversations.
Maintenance: Keeping Your Fire Pit Looking Fabulous
Quick Care Routine
- Annual sealing
- Clean after each use
- Cover during extreme weather
- Remove ash and debris regularly
Pro Photography Tips (Because Instagram Needs to See This!)
Capture the Perfect Shot
- Shoot during golden hour
- Use natural side lighting
- Include surrounding landscape
- Style with minimal, intentional props

💡 Steal This Look
- Paint Color: use Fine Paints of Europe brand. Match warm terracotta outdoor wall tones. Format: Fine Paints of Europe Burnt Sienna FPE-1847
- Furniture: low-slung weathered teak lounge chairs with canvas cushions, paired with a concrete drum side table
- Lighting: string lights draped on nearby trees or fence, plus a single sculptural outdoor floor lantern for ambient fill
- Materials: raw concrete fire bowl, untreated cedar decking, woven jute outdoor rug, matte black powder-coated steel accents
This is the setup that makes guests linger past dessert, phones forgotten, because you’ve built an outdoor room that feels discovered rather than decorated—like a secret garden moment worth preserving.
Budget-Friendly Hacks
Save Money Without Compromising Style
- Use found objects as molds
- Mix your own concrete
- Shop secondhand for styling accessories
- DIY your own cushions and accessories
Common Mistakes to Avoid
Red Flags That Scream “Rookie Move”:
- Improper drainage
- Cheap sealant
- Neglecting fire safety
- Overcrowding the space

★ Steal This Look
- Paint Color: Sherwin-Williams Urbane Bronze SW 7048
- Furniture: low-slung Adirondack chairs with wide armrests for drink placement, positioned 4-6 feet from pit edge
- Lighting: bollard pathway lights with frosted glass and oil-rubbed bronze finish
- Materials: porous crushed limestone base layer, Type S mortar for masonry joints, heat-resistant fire brick liner, marine-grade stainless steel drainage grate
I’ve watched too many weekend warriors pour beautiful circular pits only to watch them spiderweb by spring because they skipped the drainage conversation—this is the invisible engineering that separates lasting work from landfill filler.
Final Thoughts: Your Backyard Transformation Awaits
A concrete fire pit isn’t just a project – it’s an investment in unforgettable moments. From cozy family nights to epic entertaining, you’re about to become the backyard hero.
Your Next Steps
- Gather materials
- Plan your design
- Create fearlessly
- Enjoy endlessly
Pro Tip: Every epic outdoor space starts with one bold decision. This is yours.

✎ Steal This Look
- Paint Color: Benjamin Moore Kendall Charcoal HC-166
- Furniture: weathered teak Adirondack chairs with wide armrests
- Lighting: string lights with Edison bulbs on black cable
- Materials: raw concrete, blackened steel, cedar decking, river rock
This is where you’ll find yourself on crisp October evenings, wrapped in blankets, watching embers fade while conversation stretches into midnight—it’s worth every hour of planning.


—Here's How You Can Too")
[…] for one season’—the UV exposure and moisture will degrade insulation fast and create genuine fire risks you won’t see […]