
This post may contain affiliate links. Please see my disclosure policy for details.
Creating a Stunning Stone Garden Path: Your Ultimate DIY Guide
Contents
- Creating a Stunning Stone Garden Path: Your Ultimate DIY Guide
- Why Stone Garden Paths Are a Game-Changer
- Choosing Your Stone Path Style
- Essential Materials You’ll Need
- Step-by-Step Stone Path Creation
- Budget-Friendly Alternatives
- Maintenance Matters
- Common Mistakes to Avoid
- Creative Inspiration
- Photography Tips for Showing Off Your Path
- Final Thoughts
Stone garden paths transform ordinary outdoor spaces into magical landscapes that invite exploration and wonder. I’ll walk you through everything you need to know to create a breathtaking pathway that’ll make your neighbors stop and stare.

🖼 Steal This Look
- Paint Color: Sherwin-Williams Rookwood Dark Green SW 2808
- Furniture: weathered teak garden bench with slatted back, positioned at path midpoint as a contemplative rest stop
- Lighting: solar-powered brass bollard lights with seeded glass, spaced every 6 feet along path edges
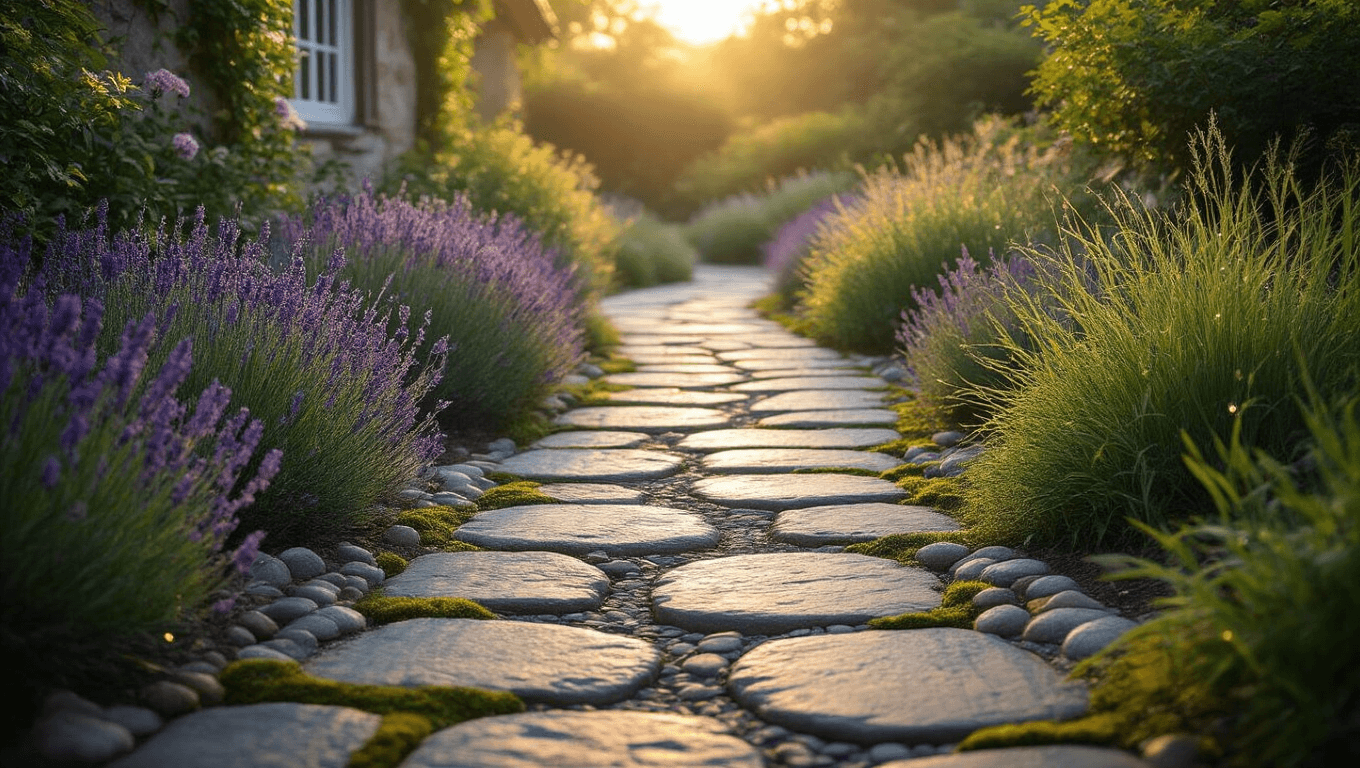
- Materials: irregular Pennsylvania bluestone flagging, crushed limestone screenings for base, polymeric sand for joints, moss plugs for intentional aging between stones
There’s something deeply satisfying about a path that wears your footprints into it over time—this is outdoor design that literally grows better with every season you live with it.
Why Stone Garden Paths Are a Game-Changer
Let’s be real – a boring, plain yard is nobody’s dream. A well-designed stone path can:
- Add instant visual interest
- Improve garden navigation
- Increase property value
- Create a natural, organic flow to your landscape
Choosing Your Stone Path Style
Design Styles to Consider
- Rustic Cottage: Irregular stones with moss-filled gaps
- Contemporary Chic: Clean-cut, uniform stone placement
- Natural Woodland: Randomly placed stones mimicking nature’s randomness

💡 Steal This Look
- Paint Color: Farrow & Ball Green Smoke 47
- Furniture: weathered teak garden bench with curved backrest positioned at path terminus
- Lighting: low-voltage brass path lights with hammered glass shades spaced 8 feet apart
- Materials: reclaimed York stone, crushed granite fines, creeping thyme plugs, aged terracotta edging
There’s something deeply satisfying about the crunch underfoot on a stone path you’ve laid yourself, and the way it ages into the garden rather than sitting on top of it.
Essential Materials You’ll Need
Gathering Your Stone Path Arsenal:
- Stones (flagstone, river rocks, slate)
- Shovel
- Tamper
- Landscape fabric
- Gravel or sand
- Wheelbarrow
- Work gloves
- Level

✎ Steal This Look
- Paint Color: Behr Canyon Wind S190-3
- Furniture: weathered teak garden bench with curved backrest
- Lighting: hammered copper pathway lantern on shepherd’s hook
- Materials: irregular Pennsylvania bluestone, crushed limestone base, moss between joints
There’s something deeply satisfying about the crunch of gravel underfoot and the way morning light hits damp stone—this is the room where you slow down and notice.
Step-by-Step Stone Path Creation
1. Planning Your Path
- Measure and mark your desired path
- Consider natural walking patterns
- Allow 24-36 inches width for comfortable walking
2. Ground Preparation
- Remove grass and topsoil
- Dig 3-4 inches deep
- Compact soil with tamper
- Lay landscape fabric to prevent weeds
3. Stone Placement Techniques
Pro Tips:
- Mix stone sizes for natural look
- Leave 1-2 inches between stones
- Create slight variations in height for visual interest
- Ensure stones are level and stable

🎨 Steal This Look
- Paint Color: Valspar Garden Stone 5004-2B
- Furniture: weathered teak garden bench with curved backrest
- Lighting: low-voltage LED path lights with hammered bronze finish
- Materials: irregular bluestone pavers, crushed limestone base, polymeric sand joints, moss groundcover
There’s something deeply satisfying about a path you’ve laid yourself—every morning walk to the garden becomes a small reminder that you shaped your own landscape, one heavy stone at a time.
Budget-Friendly Alternatives
Cost-Saving Stone Path Strategies
- Use local found stones
- Check landscape recycling centers
- Mix expensive stones with cheaper options
- Consider concrete stepping stones as budget alternative
Maintenance Matters
Keeping Your Path Looking Fabulous:
- Remove weeds quarterly
- Reset stones if they become loose
- Add fresh gravel/sand annually
- Clean with mild detergent solution

🏠 Steal This Look
- Paint Color: Dunn-Edwards Whisper DEW 340
- Furniture: weathered teak garden bench with slatted seat
- Lighting: solar-powered copper path lights with warm 2700K output
- Materials: bluestone pavers, crushed granite fines, aged terracotta edging, moss between joints
There’s something deeply satisfying about tending a stone path you’ve laid yourself—the way it settles into the landscape over seasons, growing more beautiful as moss finds its footholds.
Common Mistakes to Avoid
- Placing stones too far apart
- Ignoring drainage
- Using uniform, perfect stones
- Skipping landscape fabric
Creative Inspiration
Unique Path Design Ideas
- Incorporate LED solar lights
- Plant creeping thyme between stones
- Add decorative border plants
- Create curved, meandering paths

🎨 Steal This Look
- Paint Color: use Fine Paints of Europe brand. Match the ACTUAL wall color in the image. Format: Fine Paints of Europe ColorName CODE
- Furniture: weathered teak garden bench with curved backrest positioned as a contemplative rest stop along the path’s midpoint
- Lighting: solar-powered brass bollard lights with warm 2700K output spaced 6 feet apart along path edges
- Materials: irregular bluestone pavers with 2-3 inch gaps, crushed limestone screenings as base, creeping woolly thyme as living grout
There’s something deeply satisfying about a path that doesn’t rush you—I’ve found that homeowners who embrace the slow, winding route end up using their gardens far more than those with direct concrete walkways.
Photography Tips for Showing Off Your Path
- Shoot during golden hour
- Use wide-angle lens
- Capture path from multiple perspectives
- Include surrounding landscape
Final Thoughts
A stone garden path isn’t just a walkway – it’s a journey, an invitation to explore your outdoor space. With careful planning and a bit of creativity, you’ll transform your garden into a stunning landscape that tells a story.
Pro Tip: Take your time, enjoy the process, and let your creativity flow!

💡 Steal This Look
- Paint Color: Sherwin-Williams Garden Grove SW 7749
- Furniture: weathered teak garden bench with curved backrest
- Lighting: low-voltage brass path lights with seeded glass shades
- Materials: irregular bluestone flagging, crushed limestone fines, moss joints
There’s something deeply satisfying about a stone path that settles into your garden over time—the way moss creeps into joints, how stones shift slightly with seasons. This is outdoor living at its most soulful.


—Here's How You Can Too")